Advance Git & GitHub for DevOps Engineers: Part-3
#90DaysofDevOpsChallenge - Day-11
What is Git Stash?
Git stash is a command that allows you to save your local changes in a temporary area without committing them. It provides a way to store unfinished work or changes that you don't want to commit immediately but wants to switch to another branch or task.
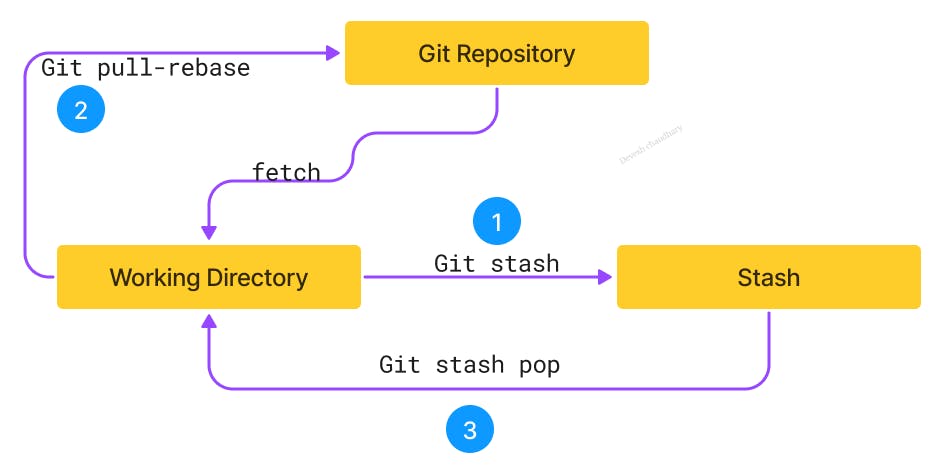
Using Git Stash:
a. Stashing Changes:
Stashing All Changes:
git stash saveorgit stashStashing Specific Files:
git stash push <file1> <file2> ...Including Untracked Files:
git stash save --include-untracked
b. Listing Stashes:
git stash listto see the list of stashesgit stash show <stash>to view the changes in a specific stash
c. Applying and Popping Stashes:
git stash apply <stash>to apply changes from a stashgit stash pop <stash>to apply and remove changes from a stash
Advanced Usage: a. Multiple Stashes:
Managing Multiple Stashes:
git stash branch <branchname>Applying a Specific Stash:
git stash apply stash@{n}
b. Stash Stack:
Creating a Stash Stack:
git stash save "<message>"Popping Stashes from the Stack:
git stash pop
- Resolving Conflicts: When applying a stash, conflicts may arise if changes conflict with the current state of the codebase. Git provides conflict resolution tools to help merge conflicting changes smoothly.
Here are some important commands for the stash.
  # Git Stash Commands Cheat Sheet

  ## Saving the work without committing
  - Save your local changes in a temporary area:
    git stash

  ## Reapplying Stashed Changes
  - Apply the most recent stash and remove it from the stash queue:
    git stash pop

  ## Saving Stashes with a Message
  - Save your changes with a descriptive message:
    git stash save "<Stashing Message>"

  ## Check the Stored Stashes
  - View the list of stored stashes:
    git stash list

  ## Deleting a Stash from the Queue
  - Remove a specific stash from the stash queue:
    git stash drop <stash>

  ## Deleting all Available Stashes at Once
  - Delete all stashes from the stash queue:
    git stash clear

  ## Reapplying Stashed Changes with `git stash apply`
  - Apply the most recent stash without removing it from the stash queue:
    git stash apply

  ## Track Stashes and Their Changes
  - View the changes stored in a specific stash:
    git stash show <stash>
What is Cherry-pick?
1. Cherry-pick is a command in Git that allows you to apply specific commits from one branch to another.
It enables you to select individual commits and incorporate them into your current branch, bringing changes from one branch into another branch without merging the entire branch history.
When you cherry-pick a commit, Git takes the changes introduced by that commit and applies them as new commits on the current branch.
This is useful when you want to bring specific bug fixes, feature implementations, or other changes from one branch to another without merging the entire branch or introducing unrelated changes.
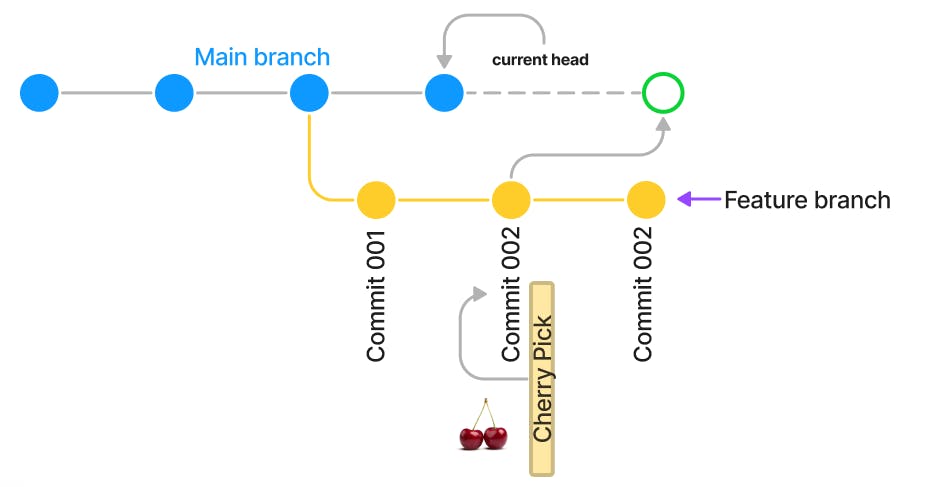
Cherry-pick is a powerful command in Git that allows you to selectively apply specific commits from one branch to another. Here are the essential commands related to cherry-picking:
Applying a Single Commit:
git cherry-pick <commit>This command applies a specific commit to the current branch.
Applying Multiple Commits:
git cherry-pick <commit1>..<commit2>Use this command to apply a range of commits (from
commit1tocommit2) to the current branch.Applying Commits from Another Branch:
git cherry-pick <branch>Apply all commits from another branch to the current branch.
Skipping Commit Metadata:
git cherry-pick -n <commit>Apply a commit without including its original authorship or commit message.
Resolving Conflicts:
When conflicts occur during cherry-pick, manually resolve them and use the:
git cherry-pick --continueTo abort the cherry-pick operation and return to the original state:
git cherry-pick --abort
Skipping Pre-Commit and Post-Commit Hooks:
git cherry-pick --no-commit <commit>Apply a commit without running pre-commit and post-commit hooks.
Cherry-picking a Range of Commits Excluding the First:
git cherry-pick <commit1>^..<commit2>Apply a range of commits excluding the first commit.
Cherry-picking a Range of Commits Including the First:
git cherry-pick <commit1>~..<commit2>Apply a range of commits including the first commit.
Applying Commits with a Specific Parent:
git cherry-pick -m <parent-number> <commit>Apply a commit that has multiple parents, selecting a specific parent.
Cherry-picking is a valuable tool for incorporating specific commits into your branches, enabling you to selectively bring in changes without merging entire branch histories. However, it's important to review the changes and potential conflicts to ensure a smooth integration process.
Resolving Conflicts :
Resolving conflicts is an integral part of using Git when conflicts occur during operations like merging, rebasing, or cherry-picking. Here are the steps to resolve conflicts in Git:
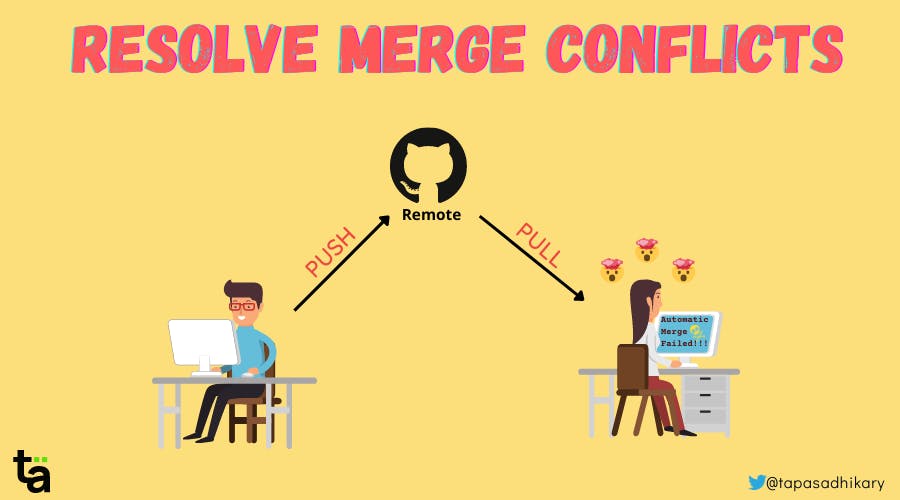
Identify Conflicts: When a conflict occurs, Git will notify you about the conflicting files. You can use the
git statuscommand to see which files have conflicts. Git will mark the conflicted sections within the files with special markers (<<<<<<<, =======, and >>>>>>>).Open the Conflicted File: Open the conflicted file(s) in a text editor or an integrated development environment (IDE) capable of handling Git conflicts.
Resolve the Conflicts: Inside the conflicted file, locate the conflicting sections marked by the markers (<<<<<<<, =======, and >>>>>>>). Review the conflicting changes and decide how to resolve them. You have a few options:
Keep the changes from one side: Delete the conflicting lines from one side (e.g., everything between <<<<<<< and ======= markers or between ======= and >>>>>>> markers) to accept the changes from the other side.
Manually edit the conflicting lines: Modify the conflicting lines manually to merge the changes from both sides. Customize the code to combine the desired functionality.
Use a merge tool: Some IDEs or text editors provide built-in merge tools that can help resolve conflicts visually. These tools allow you to compare the conflicting versions side by side and select the desired changes.
Save the Resolved File: After resolving the conflicts, save the file with the resolved changes.
Stage the Changes: Use the
git addcommand to stage the resolved file(s) after saving the changes. For example:git add path/to/resolved-file.extCommit the Changes: Once all conflicts are resolved and staged, use the
git commitcommand to create a new commit that includes the resolved changes.git commitContinue the Operation: If you were in the middle of an operation like merging or cherry-picking, you can continue the operation by executing the corresponding Git command. For example:
git merge --continueThis completes the operation with the resolved conflicts.
By following these steps, you can effectively resolve conflicts in Git and ensure that your codebase is in a consistent state, incorporating the desired changes from conflicting branches or commits.
Task-01
Create a new branch and make some changes to it.
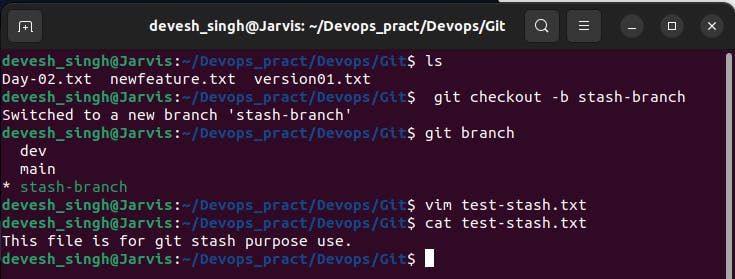
Use git stash to save the changes without committing them.

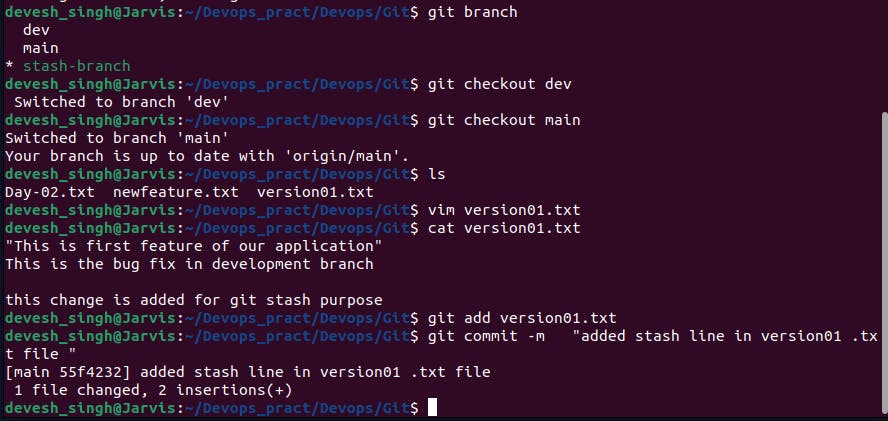
Switch to a different branch, make some changes and commit them.
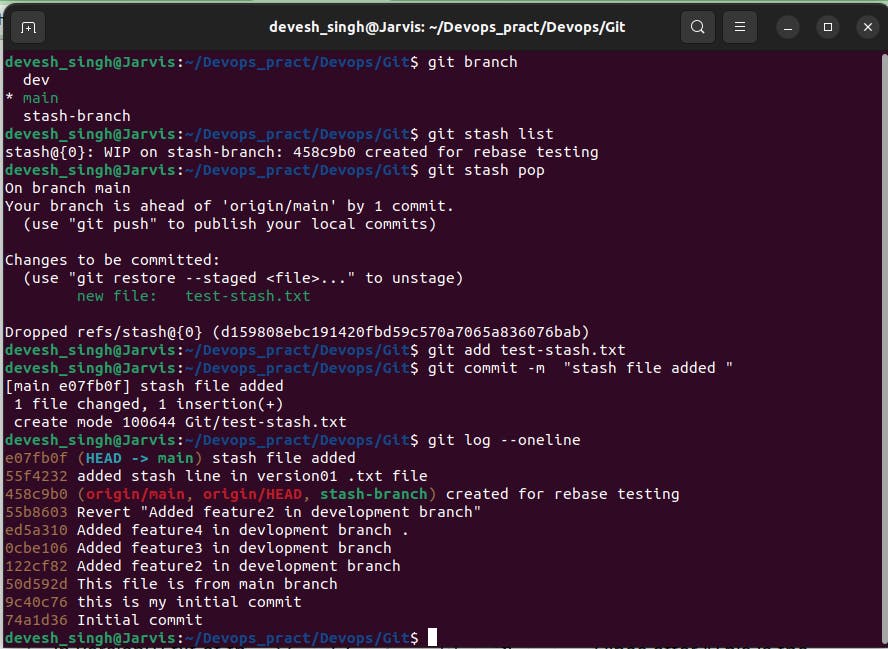
Use git stash pop to bring the changes back and apply them on top of the new commits.
Task 2:
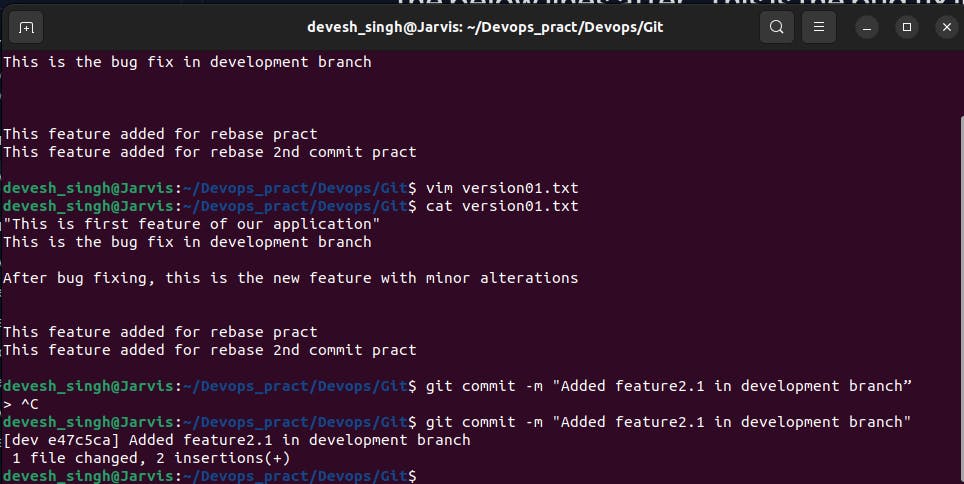
In version01.txt of the development branch add the below lines after “This is the bug fix in development branch” that you added in Day10 and reverted to this commit.
Line2>> After bug fixing, this is the new feature with minor alterations”
Commit this with the message “ Added feature2.1 in development branch”
Line3>> This is the advancement of the previous feature
Commit this with the message “ Added feature2.2 in development branch”

Line4>> Feature 2 is completed and ready for release
Commit this with the message “ Feature2 completed”
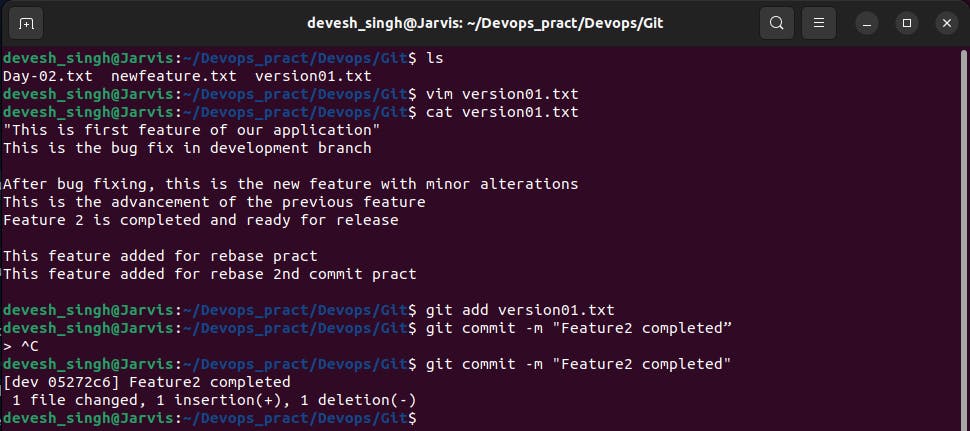
All these commits messages should be reflected in the Production branch too which will come out from the Master branch (Hint: try rebase).
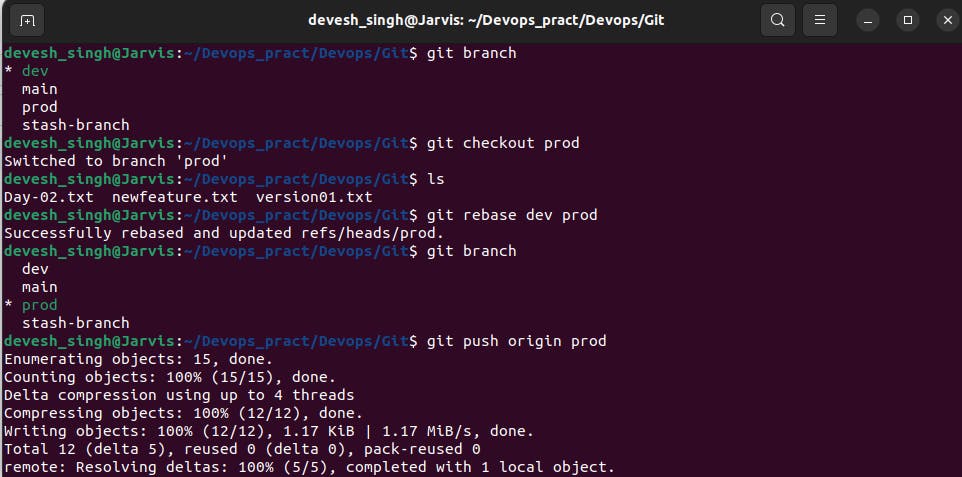
Result:-

Task 3:-
In the Production branch Cherry pick Commit “Added feature2.2 in development branch” and added the below lines in it:
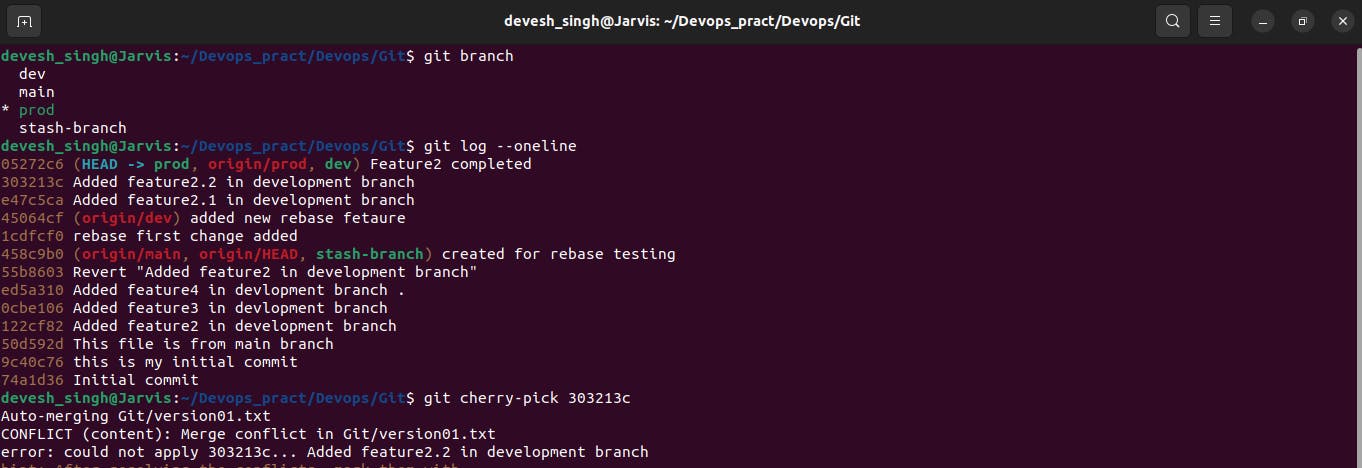
The line to be added after Line3>> This is the advancement of the previous feature
Line 4>>Added a few more changes to make it more optimized.
Commit: Optimized the feature

Thank you for taking the time to read this article on DevOps and #90daysofDevOps! I sincerely hope you found it helpful and informative.
If you have any questions or suggestions for improvements, please don't hesitate to reach out. Your feedback is valuable to me.
see you in the next blog ...
Wishing you continued success and happy learning on your DevOps journey!
