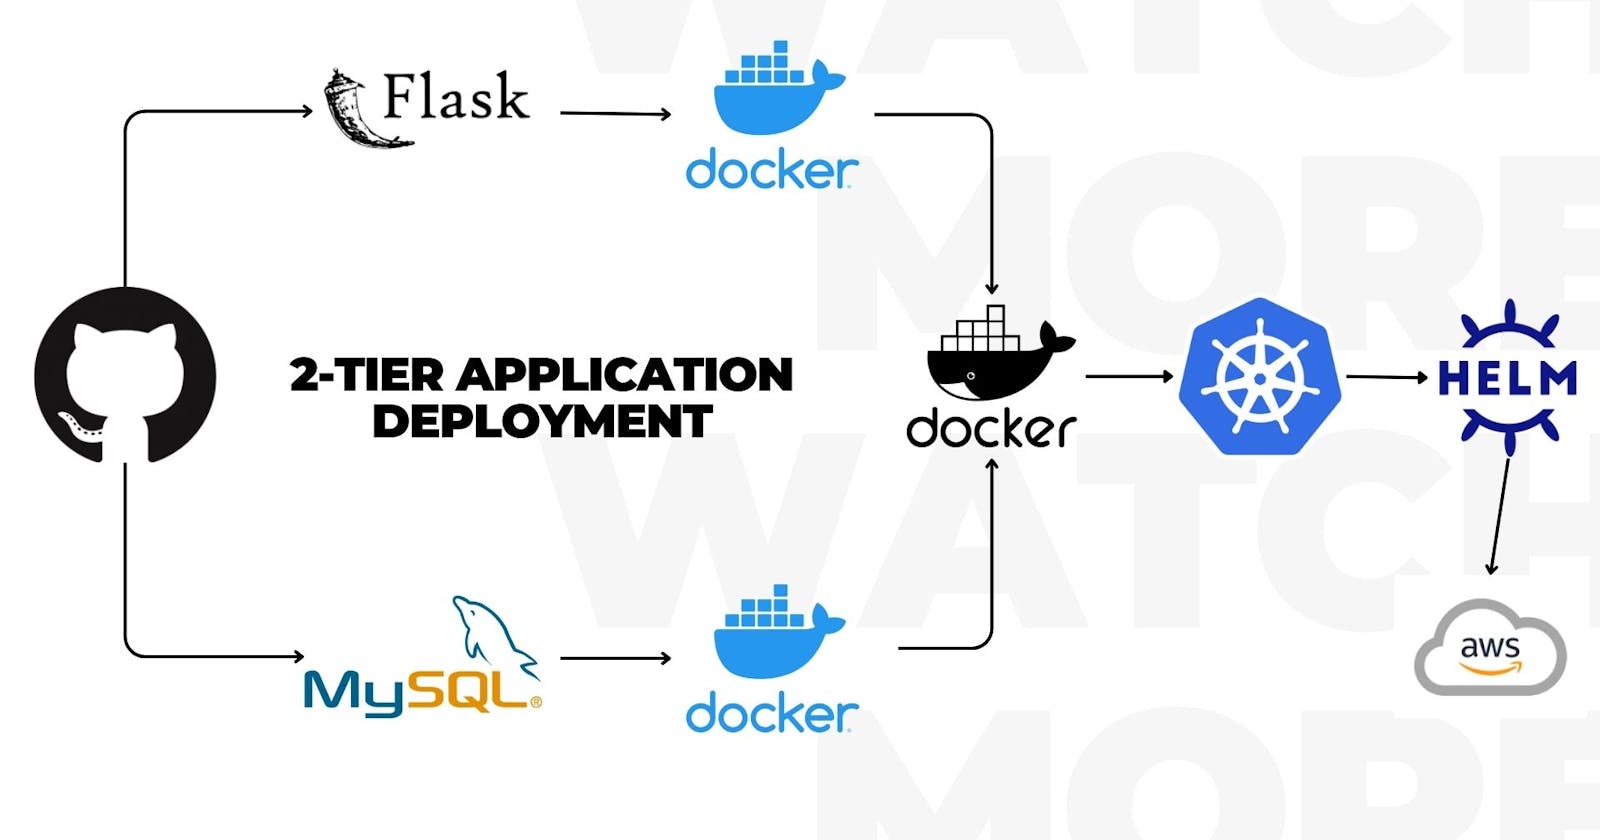
Deployment of 2-tier python-flask applications with the help of Docker, Kubernetes, AWS, and HELM packaging.


Table of contents
- This is some basic setup and Dockerfile creation.
- Now we have created a Dockerfile so it is time to build images and create containers out of the Dockerfile.
- After all is set, we know that our application image is perfect so we are going to push that Image to the Docker Hub.
- Now at this step, we will create a Kubernetes cluster with kubeadm and deploy the application with more functionality like Autoscaling, Autohealing, etc...
- Here we will automate all k8s yaml file creation with the help of HELM charts.
This is some basic setup and Dockerfile creation.
First, Create an EC2 instance connect it with the localhost device, and then clone the project code from the GitHub repo:
https://github.com/D-singh121/flask-mysql-app-k8s-helm-deployment.git

Here, the Docker file is already present, so let's delete the file first and then create a new one.
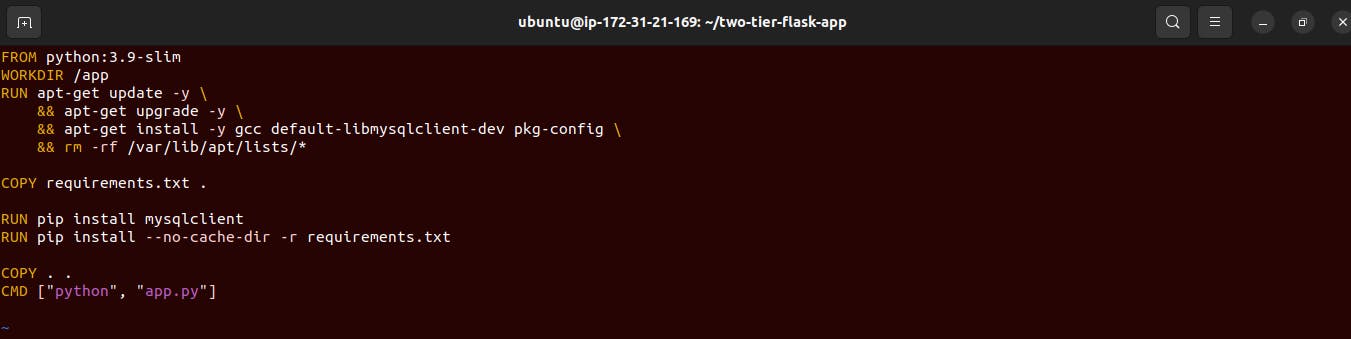
1. we are using the
python:3.9 slimversion as our base image.2. creating
/appa directory as our main working directory for the entire codebase.3. In 3rd line we are installing the required packages for the system.
4. Copy the requirements file into the container.
5. Installing the app dependencies to run containers.
6. Copy the rest of the application code from the repo to the container directory.
7. It's a simple run command for our application.
Now we have created a Dockerfile so it is time to build images and create containers out of the Dockerfile.
Docker Images Build:-
Here is the build command for our docker images but before running the build command make sure to have docker installed on the working machine with all permissions.
  docker build -t flaskapp:latest .
  # -t --> tagging the image.
  # .  --> dot means the same directory.
Now we need one more image for MySQL as the database for our app but
before creating the image remember that our Flask app container and our database container must have a connection, for that purpose we will create a Docker Network.
  docker network create flask-mysql-network
  # flask-mysql-network    <--- network name
Now we can create the Image and Container of MySQL database with a network attached to it.
  docker run -d -p 3306:3306 --network=flask-mysql-network -e MYSQL_DATABASE=myDb -e MYSQL_USER=admin -e MYSQL_PASSWORD=admin -e MYSQL_ROOT_PASSWORD=admin --name=mysql mysql:5.7
  # here mysql need some credentials so that is here,
  # -e MYSQL_DATABASE=myDb
  # -e MYSQL_USER=admin
  # -e MYSQL_PASSWORD=admin
  # -e MYSQL_ROOT_PASSWORD=admin
  # --name=mysql   // name of container
  # mysql:5.7     // mysql image version
first, this code will check the image locally, if it does not get then this will get it from the internet source.

Now we have the images of both our Flask app and database and also we have MySQL docker container running on port 3306 so we need only the app container now.
Let us create the container of the flask app from the flask app image.
  docker run -d -p 5000:5000 --network=flask-mysql-network -e MYSQL_HOST=mysql -e MYSQL_USER=admin -e MYSQL_PASSWORD=admin -e MYSQL_DB=myDb --name=flaskapp  flaskapp:latest
  # here we are using the same mysql database and username for connection.
  # application running on Port= 5000
After running the above command we can check the running container.
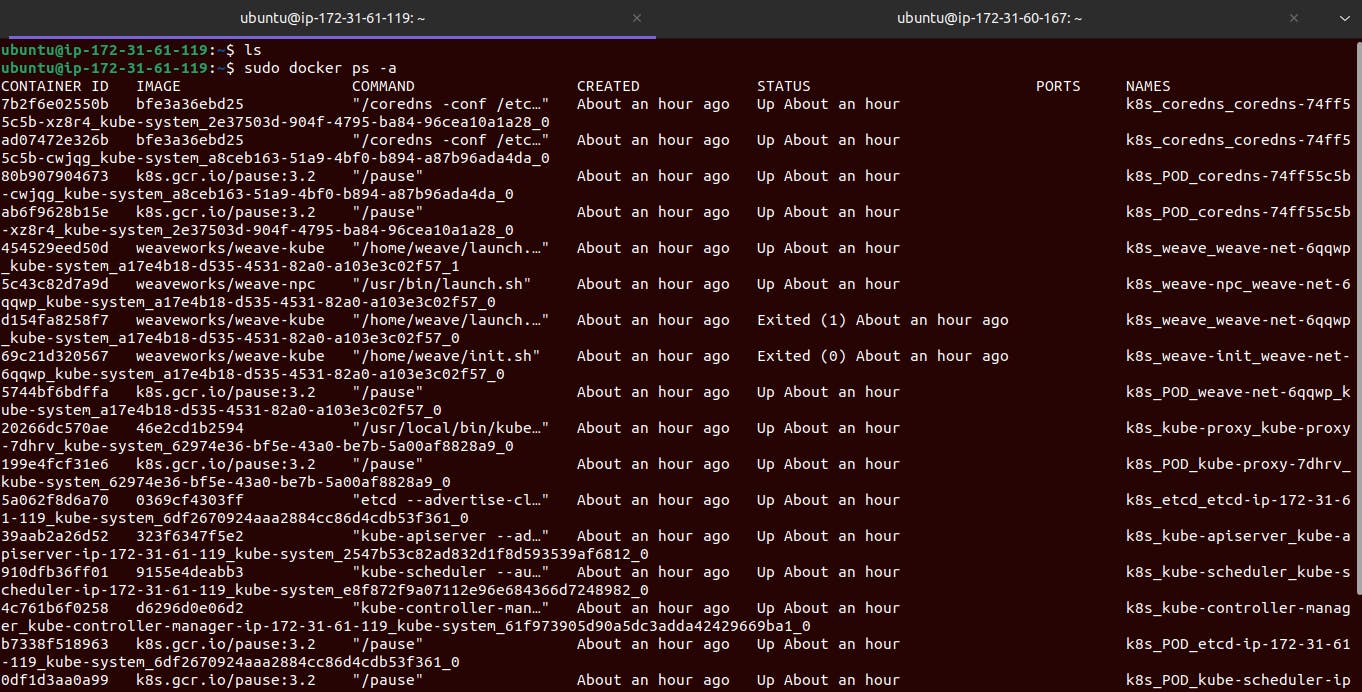
docker ps -a
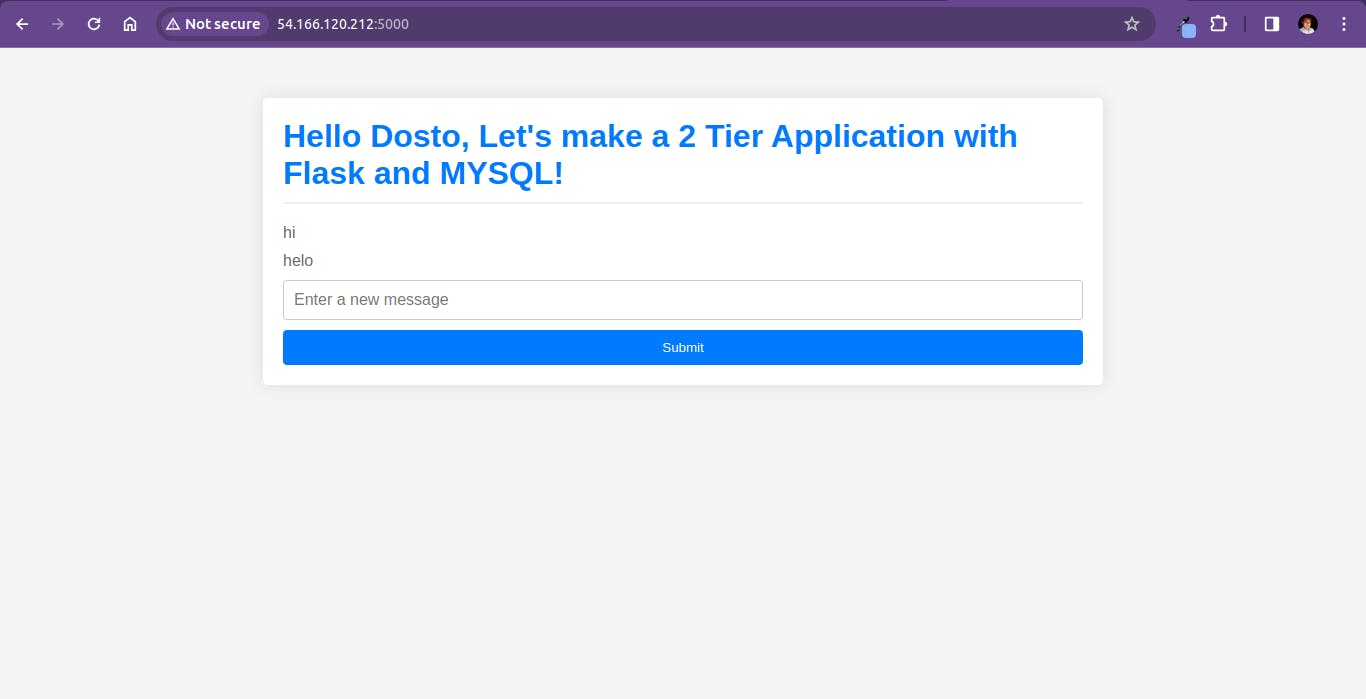
Let's check the application running on PORT 5000.
copy the public IP of our EC2 instance and use it with port 5000
like this :
54.166.120.212:5000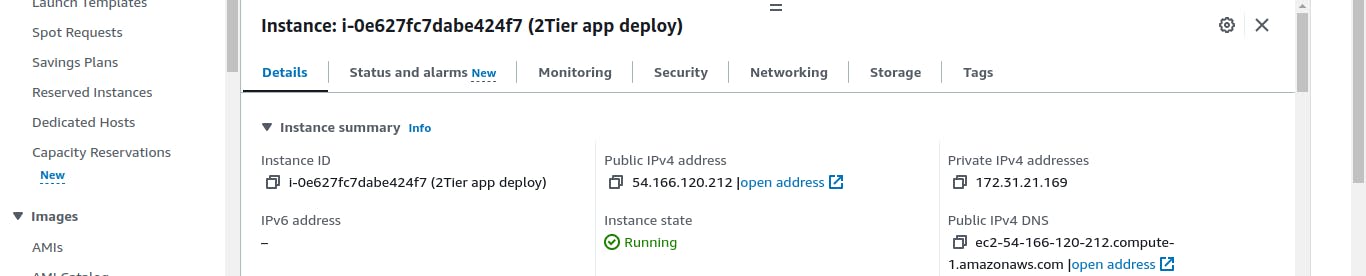
Our application will look like this :)
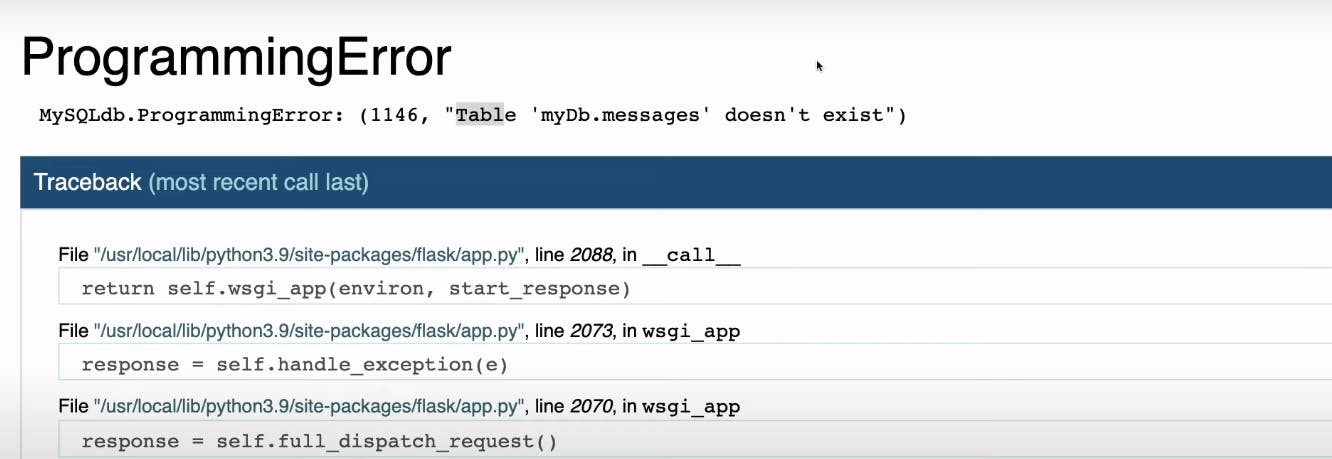
But we caught some errors so let's fix them for that we have to do some configuration with the database so get inside the MySQL database and check for the database name
myDb.Run the below commands;
  docker exec -it mysql_containerID bash
  # exec  <--execute
  # -it   <-- intractive mode
# login with root mysql user mysql -u root -p # -u => user # -p => password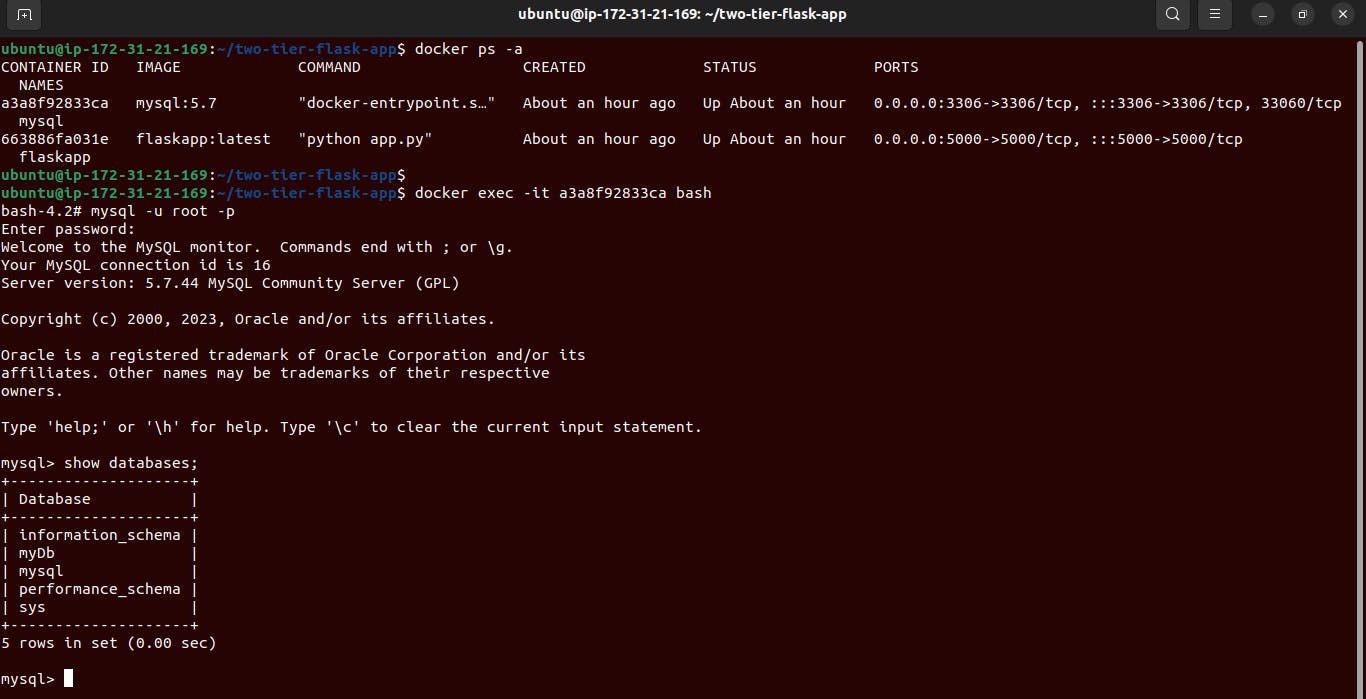
after this just use the myDb database and create a table with this command.
  mysql> use myDb
  mysql> CREATE TABLE messages (
      id INT AUTO_INCREMENT PRIMARY KEY,
      message TEXT
  );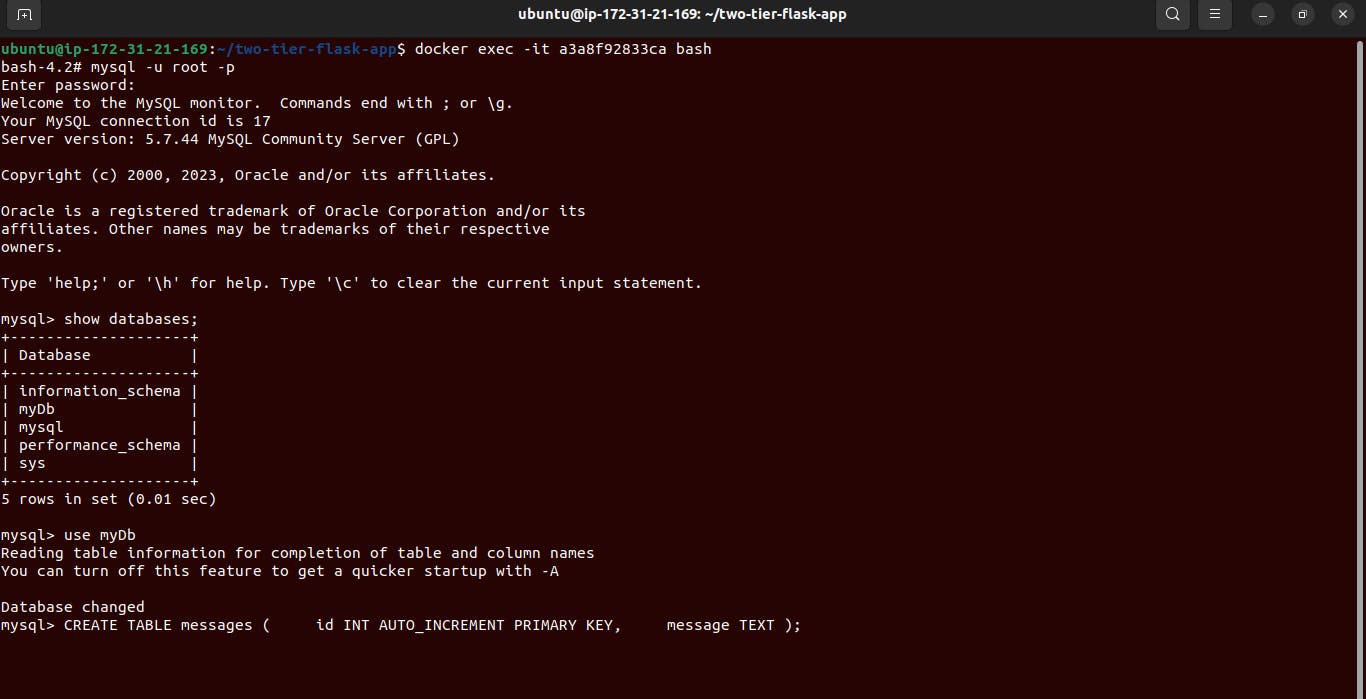
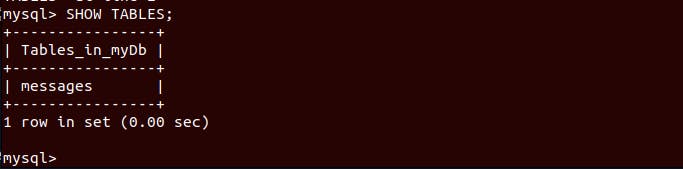
After doing this we have no errors and our application is running successfully and accessible on the browser.
After all is set, we know that our application image is perfect so we are going to push that Image to the Docker Hub.
First log in with Docker hub credentials
using these commands ;
  docker login
  # type username and password for Docker Hub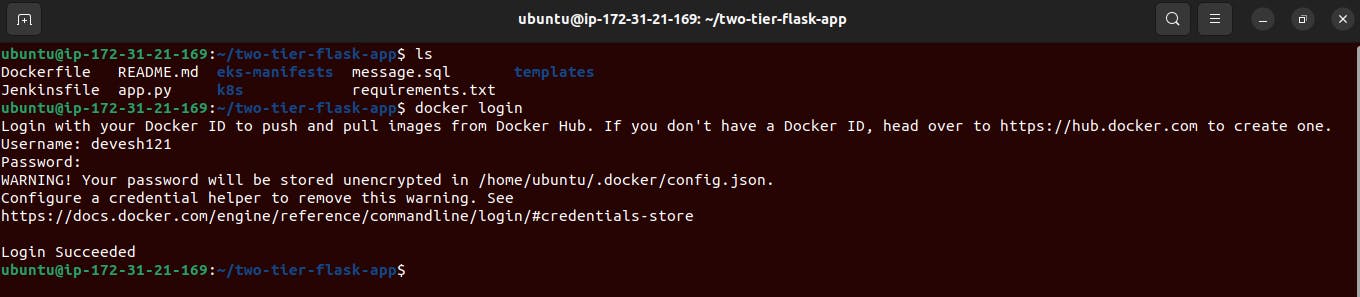
Before pushing the image to the docker hub we have to tag it with the docker hub username.
  docker tag flaskapp:latest  docker_hub_user_name/flaskapp:latest
  # docker_hub_user_name    <--- please change it according to your dockerhub username.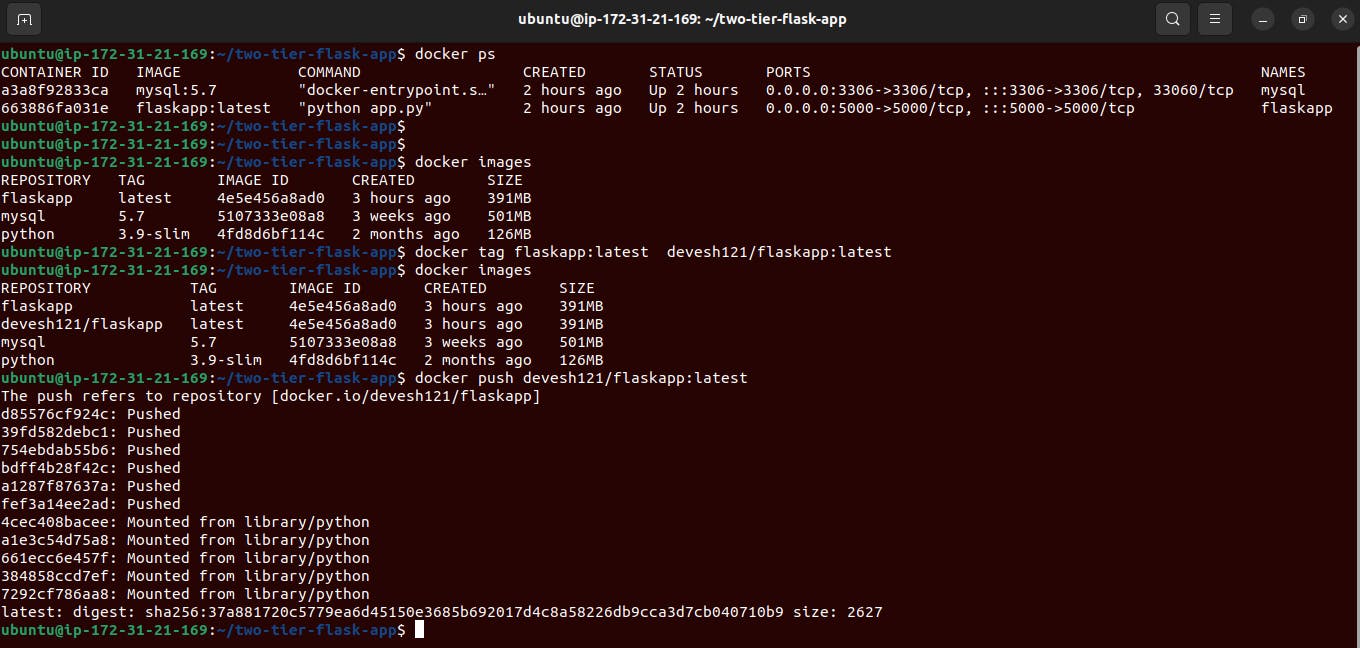
we can make this process more simple with the help of Docker-compose.
make a docker-compose.yml file and define both services over there.
vim docker-compose.yml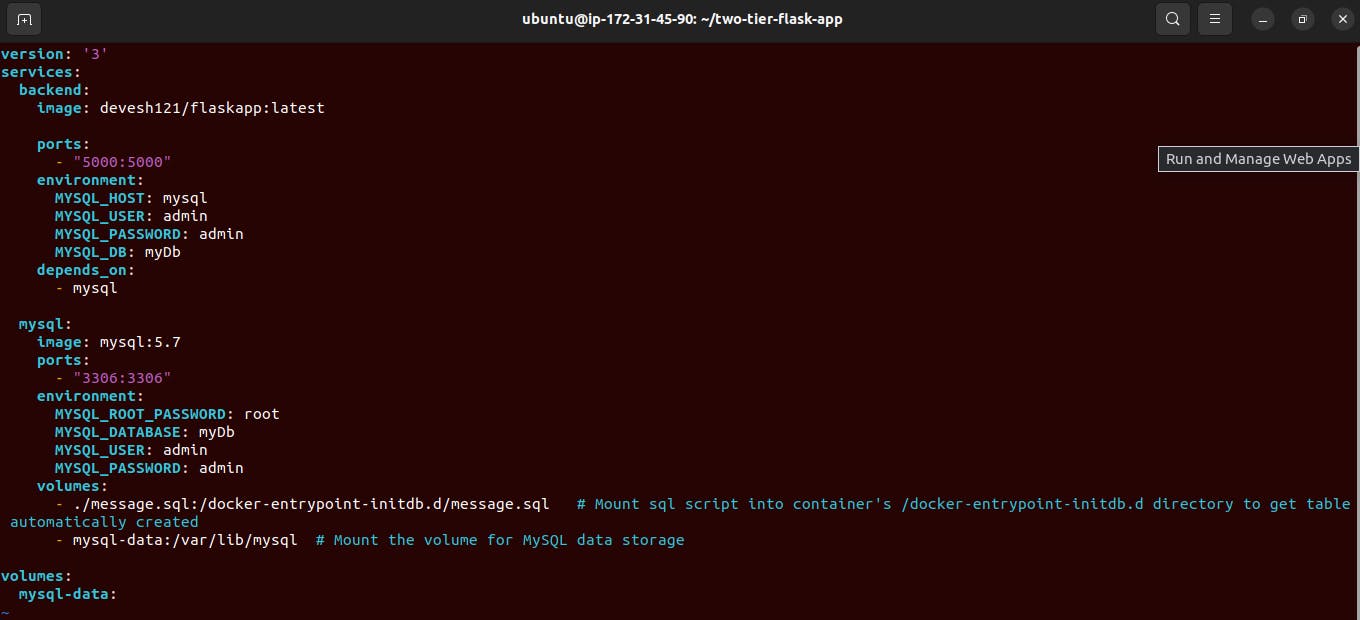
Here we are defining 2 services one for flask-app and another one for MySQL database.
We are using our docker-pushed image here for the backend service.
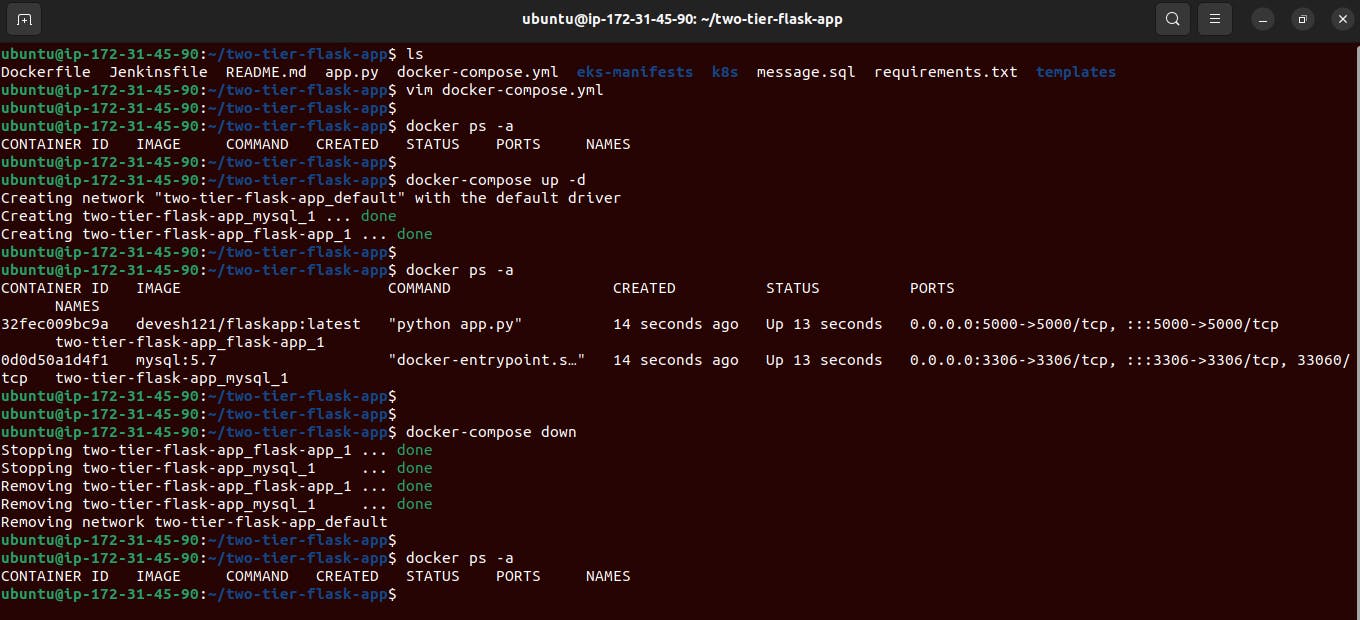
After the file gets created we will use only two commands to run and stop the container.
    docker-compose up -d
    # -d  <--- detached mode

    docker-compose down       # to stop the container
here we can see them,
Now at this step, we will create a Kubernetes cluster with kubeadm and deploy the application with more functionality like Autoscaling, Autohealing, etc...
First create two t2.medium or higher configuration Instances, one for the Master node and another for the Worker node, there may be multiple workers.
go to AWS and create an Instance.

Now connect these instances with SSH from the local device servers. (simply from our laptop or computer)
.pemfile must be present there in our local device folder.sudo ssh ssh -i "genral_key_pair_og.pem" ubuntu@ec2-54-144-158-85.compute-1.amazonaws.com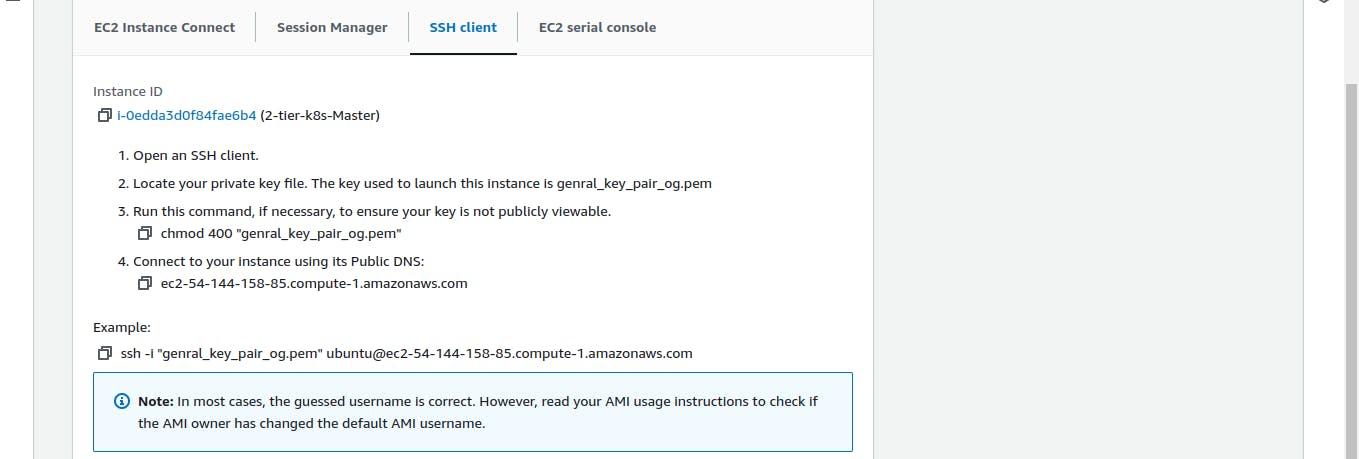
After connecting it will look like this.

At this step, we have to set up the k8s cluster of master and worker nodes with the help of kubeadm.
Simply copy these commands and run them on both the Master and the Worker nodes.
  # using 'sudo su' is not a good practice.
  sudo apt update
  sudo apt-get install -y apt-transport-https ca-certificates curl
  sudo apt install docker.io -y

  sudo systemctl enable --now docker # enable and start in single command.

  # Adding GPG keys.
  curl -fsSL "https://packages.cloud.google.com/apt/doc/apt-key.gpg" | sudo gpg --dearmor -o /etc/apt/trusted.gpg.d/kubernetes-archive-keyring.gpg

  # Add the repository to the sourcelist.
  echo 'deb https://packages.cloud.google.com/apt kubernetes-xenial main' | sudo tee /etc/apt/sources.list.d/kubernetes.list

  sudo apt update
  sudo apt install kubeadm=1.20.0-00 kubectl=1.20.0-00 kubelet=1.20.0-00 -y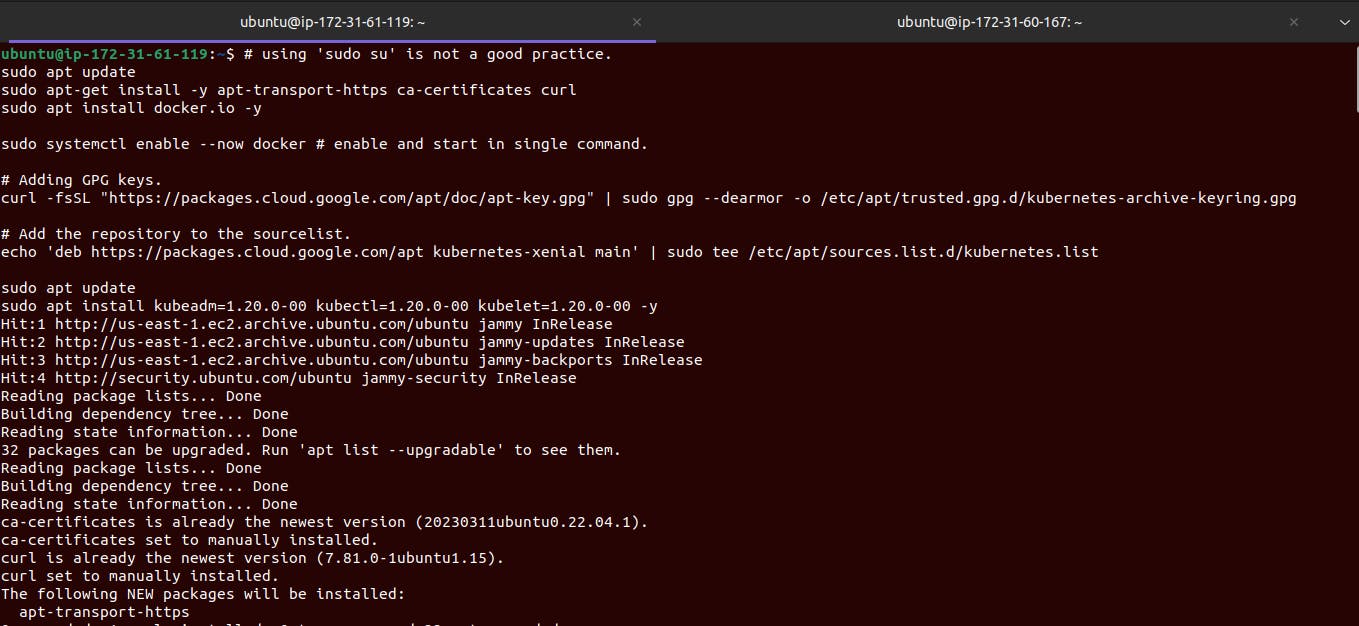
Let's Initialize the Kubernetes master node.
  # Run on master node.
   sudo kubeadm init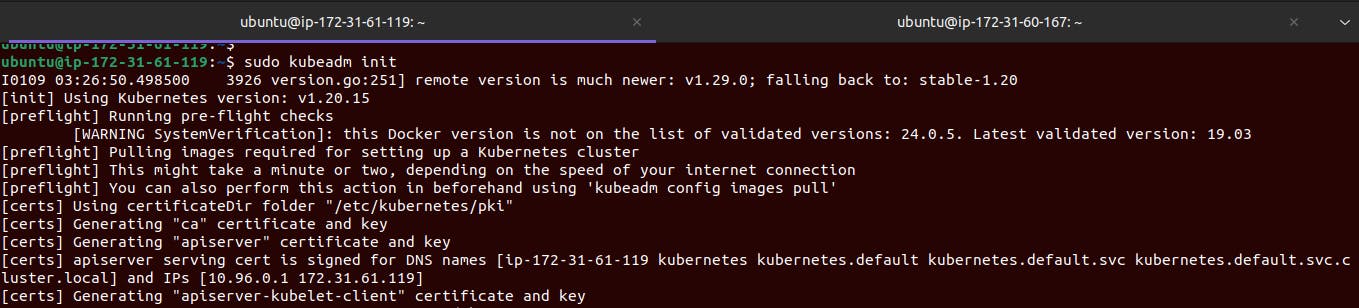
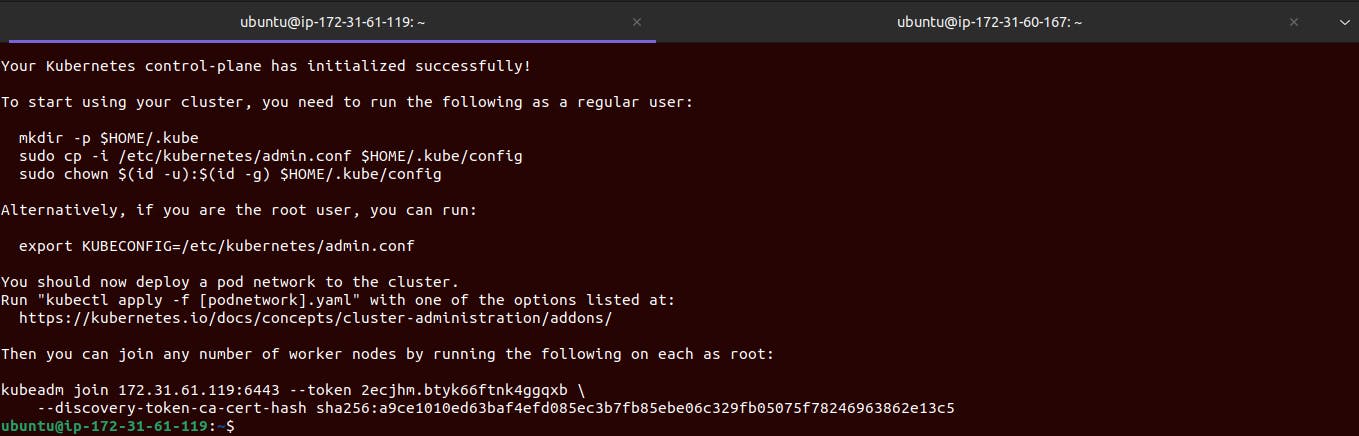
Set up local kubeconfig (both for the root user and normal user):
  # run on the master node only.
  mkdir -p $HOME/.kube
  sudo cp -i /etc/kubernetes/admin.conf $HOME/.kube/config
  sudo chown $(id -u):$(id -g) $HOME/.kube/config
K8s master and worker node connection are performed using the Weave network, so run the below command on the master node.
kubectl apply -f https://github.com/weaveworks/weave/releases/download/v2.8.1/weave-daemonset-k8s.yaml
Now our master node is Ready and the worker node is to be configured. let's do this.
Imp: we have set kubeadm on our master node so make sure kubeadm is not applied on the worker node for that reason we will do a kubeadm reset in worker nodes.
  # on worker nodes.
  sudo kubeadm reset pre-flight checks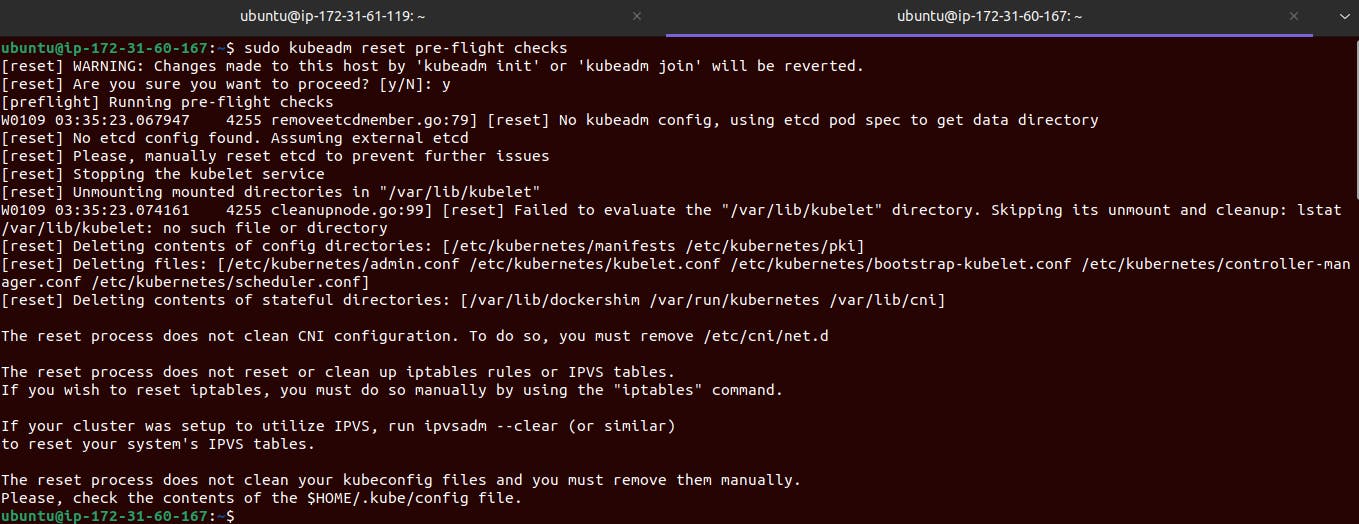
After this we will connect our worker node with the Master node for that we need a token generated by the master node.
  # on master nodes.
  sudo kubeadm token create --print-join-command
So we got the token now so let's make the connection with the master and worker node. go to the worker node and paste this below command.
Note:- you have to copy-paste your master-generated token for connection.
  # on worker node.
  sudo kubeadm join 172.31.61.119:6443 --token yax4na.emm4whyw2o53ueu3     --discovery-token-ca-cert-hash sha256:a9ce1010ed63baf4efd085ec3b7fb85ebe06c329fb05075f78246963862e13c5 --v=5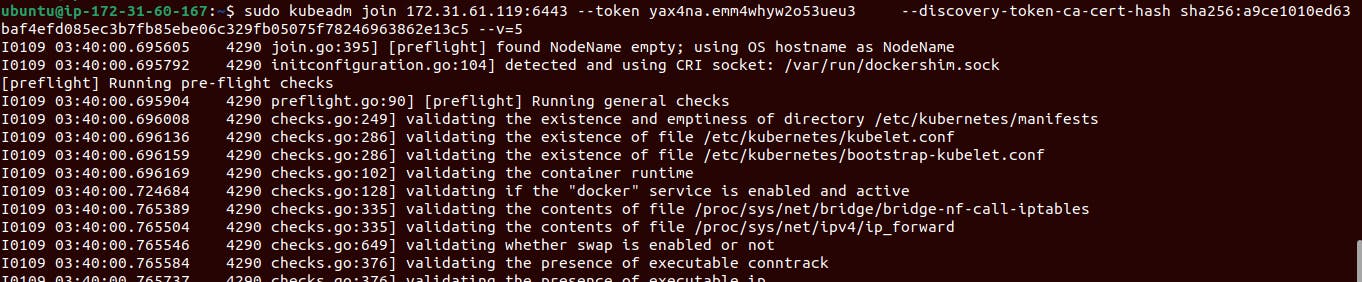
Finally, we have configured the master and worker nodes and we can verify them as well.
  # on master node.
  kubectl get nodes
This step involves pod creation and deployment of the application on the worker node.
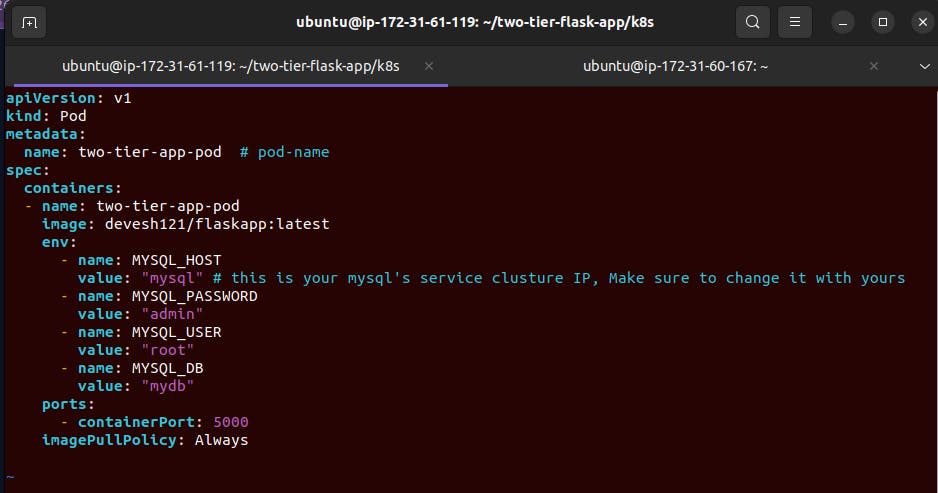
First, we will create a
pod.ymlfile that will hold the configuration of the pod image, port, and other things. here our flask app will need the credentials of the MySQL database.and the docker image we are pulling and using from our docker hub.
Our application runs on PORT 5000
vim two-tier-app-pod.yml
    # pod yaml file is ready let's apply them
    kubectl apply -f file_name.yml
    eg: kubectl apply -f two-tier-app-pod.yml
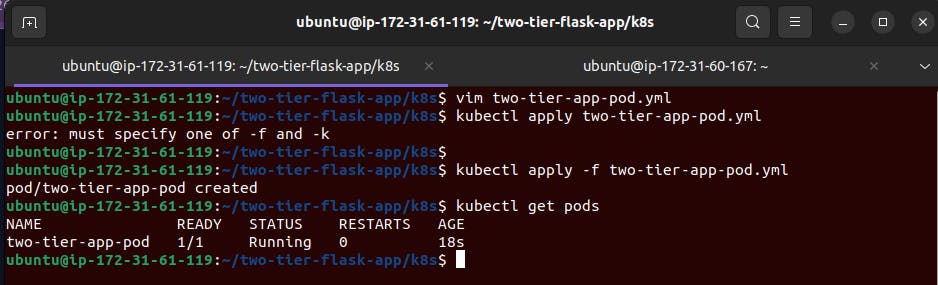
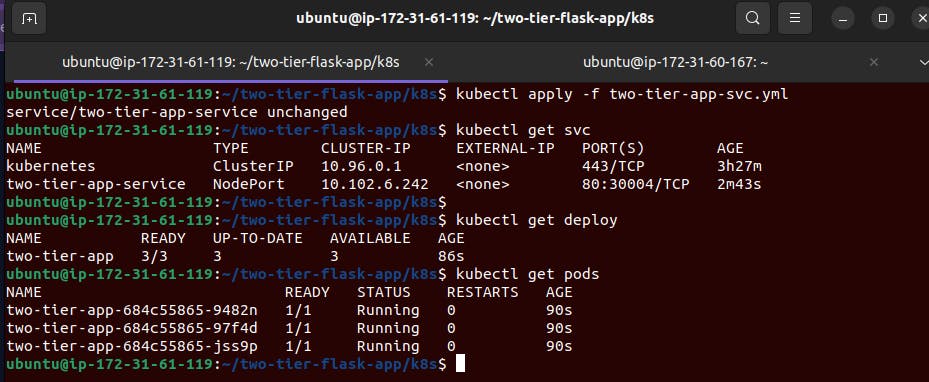
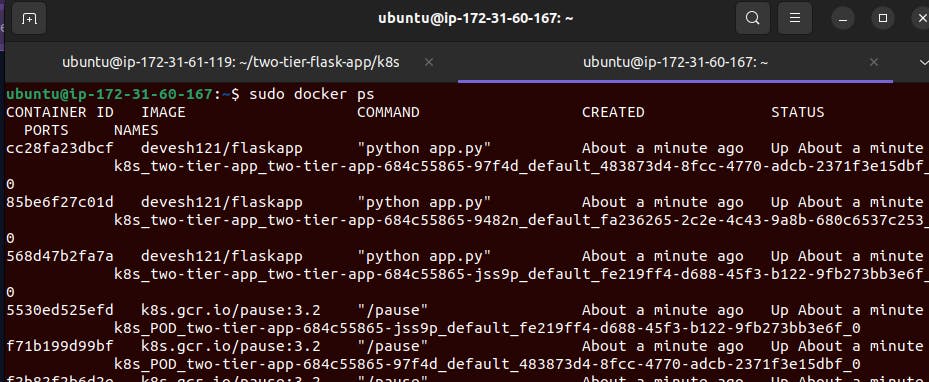
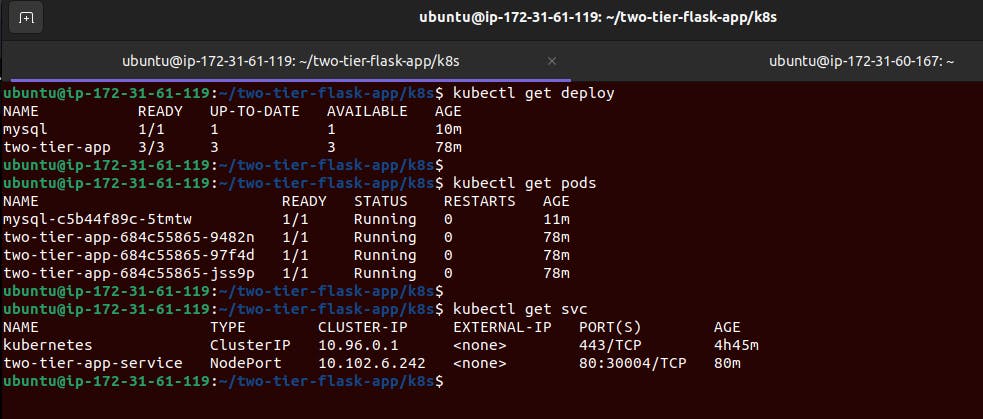
We can check that our app pod is running on the worker node.
Our pod is ready and running but the auto-scaling and auto-healing features have not been achieved yet for that we need to create a deployment of this pod.
vim two-tier-app-deployment.yml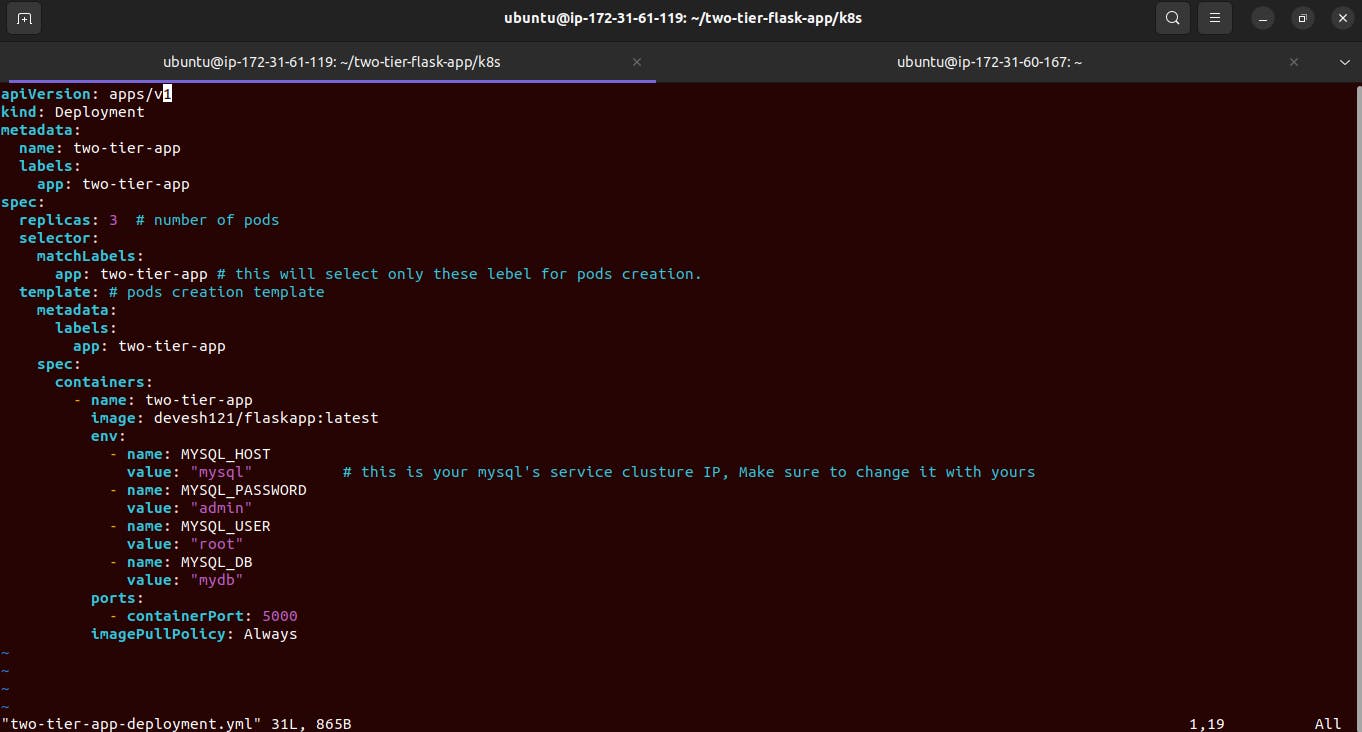
Here we create 3 pods which are mentioned on replicas ;
The selector will select only those pods that match the deployment labels with the pods label;
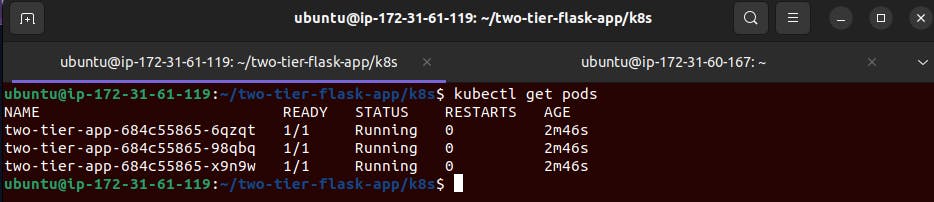
Here we can see our 3 pods are up now.
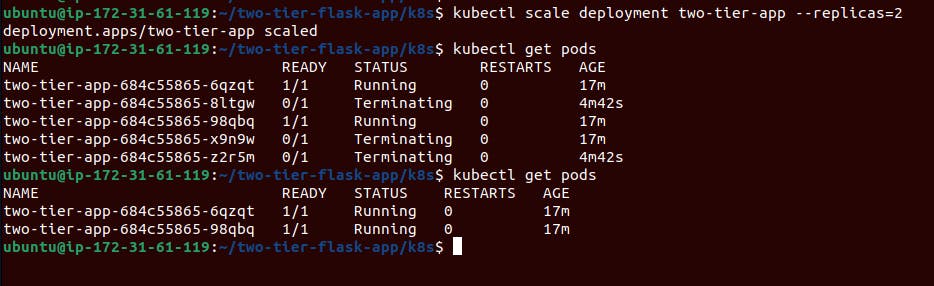
Now we can do autoscale up and down and autohealing is by default.
initially, we have 3 pods running so we are going to increase it by 2 means a total of 5 pods.
  kubectl scale deployment deployment_name  --replicas=5
  # deployment_name  <--- use as per your deployment name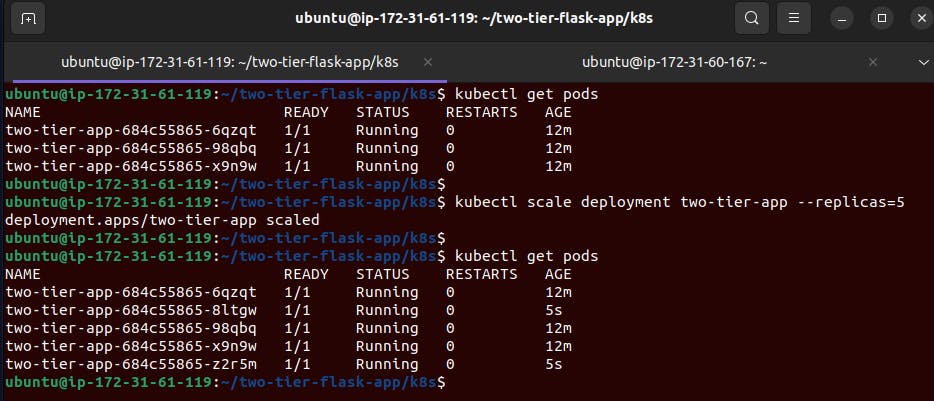
Ok, so till now we have done with pod creation, deployment creation with auto-scaling, and auto-healing. now we know that accessing these pods or containers that are running in an isolation medium needs some kind of port mapping which we can do with the help of Kubernetes service.
Kubernetes services are mainly 3 types;
Cluster IP -> can be accessible only inside the k8s cluster
NodePort -> can be accessible at only nodes
LoadBlancer -> For large networks or the outside world ( like Amazon, YouTube, etc)
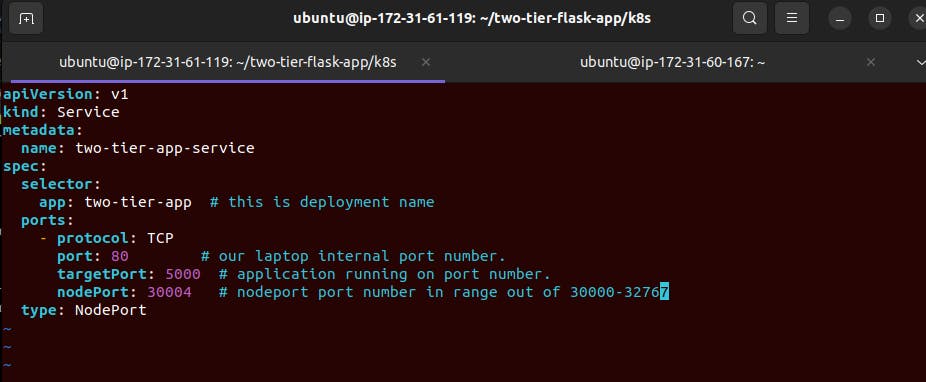
Here we are going to use a NodePort-type service.
so let's create the service.yml file
vim two-tier-app-svc.yml
Now we have to apply this service yaml file. Before applying the service yaml file make sure that deployment is applied and pods are running.
    kubectl apply -f service_file.yaml
    eg :- kubectl apply -f two-tier-app-svc.yaml
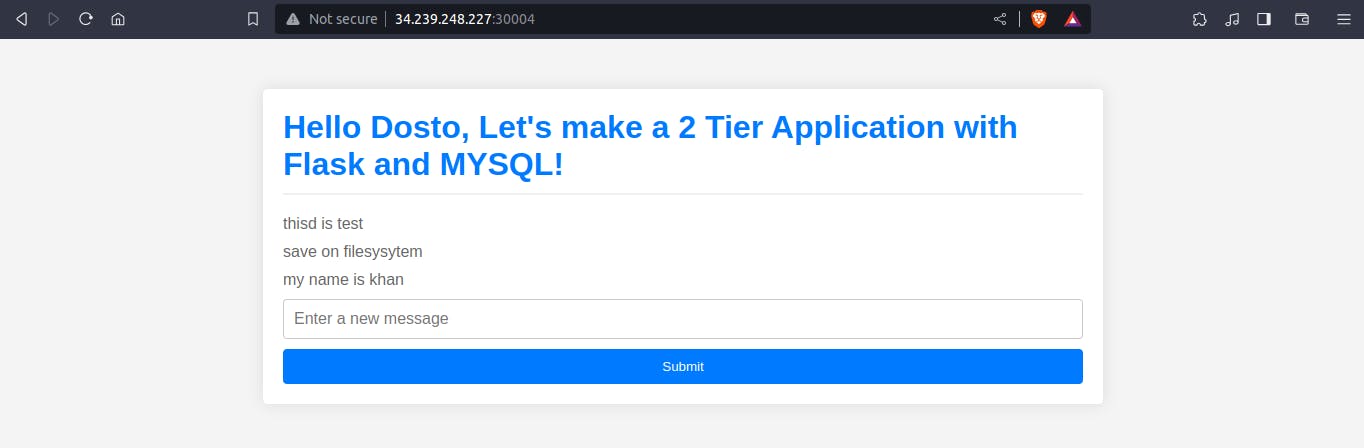
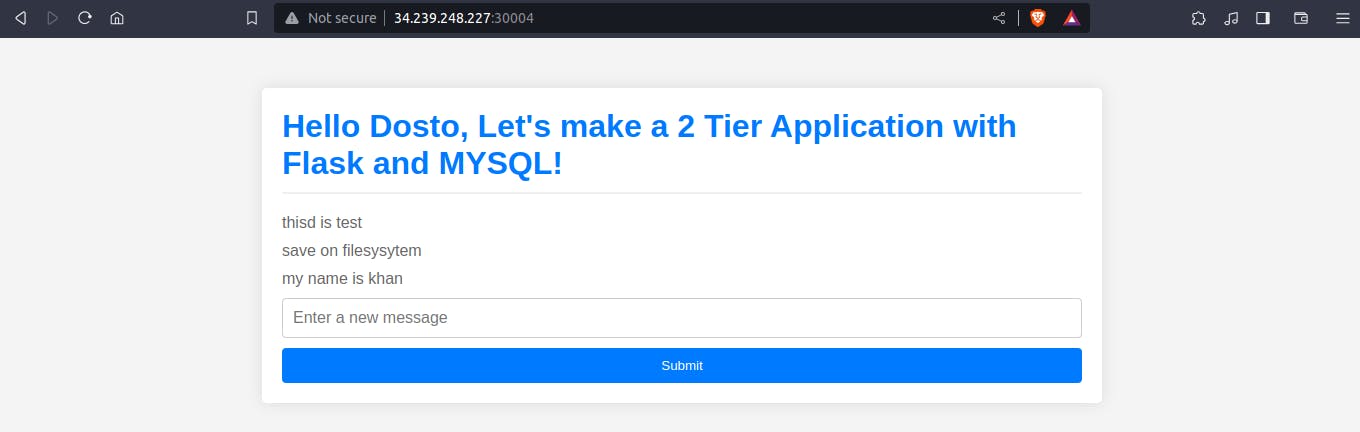
Now we can access our application on port number 30004 which is NodePort Port.
worker_node_public_ip:NodePort_port
34.239.248.227:30004/
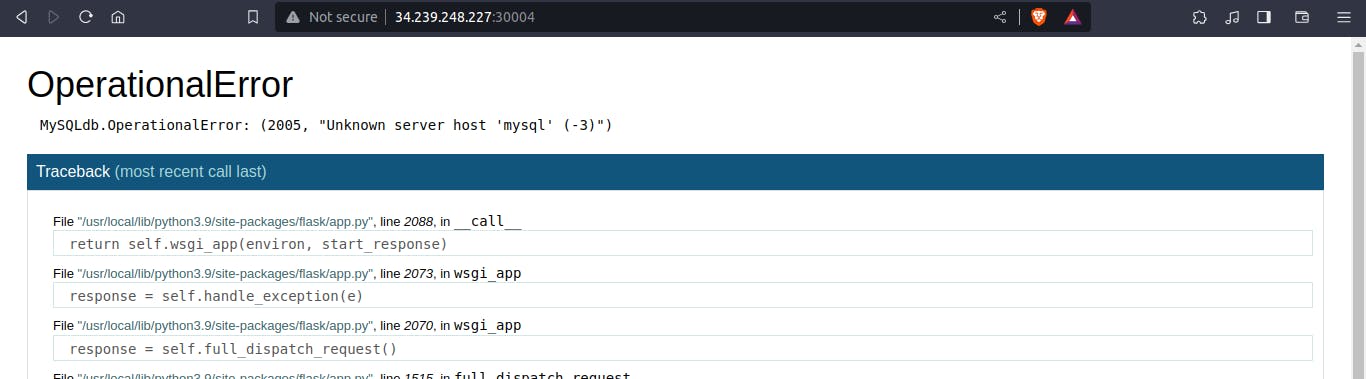
Oh..... you will think here if we have done all things correctly then why did this error occur while accessing the app on the desired port so, my friend we have only the app pods running but not the MySQL database pods. So let's make the database pods run.
This will involve 3 step
mysql_pod.ymlcreation.mysql_deployment.yamlcreationmysql_svc.ymlcreation.
The first step is pod creation but we will incorporate this step in the deployment file.
The deployment step of mysql deploy.
vim mysql-deployment.yml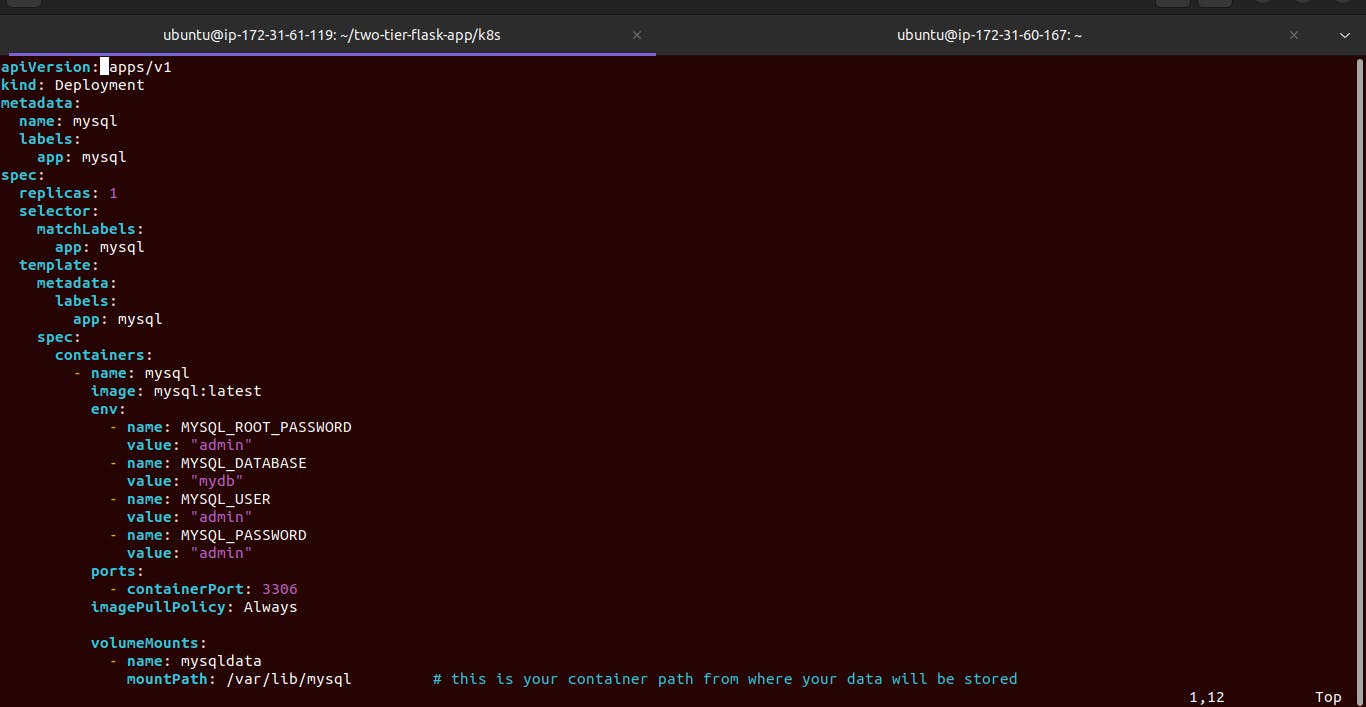
Here we will face some persistent volume errors which are simply storage errors while attaching the database to the application pods.
so we will give some space to our database pods from our application file.
Let's create the persistent volume for the MySQL database
vim mysql-pv.yml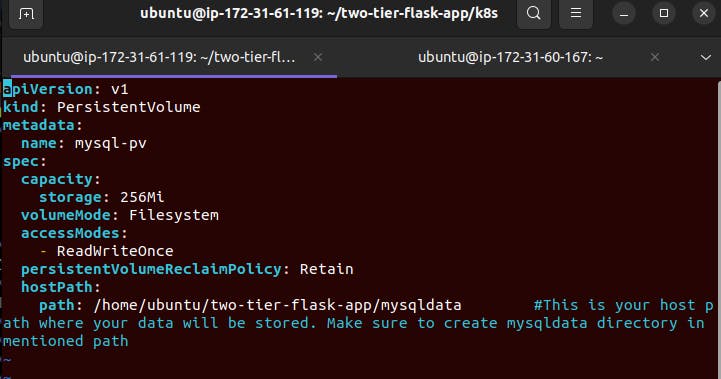
giving only 256mb storage
It has only read-and-write access
we need some host path in the filesystem to store the data. for that create a folder
mysqldatain the host file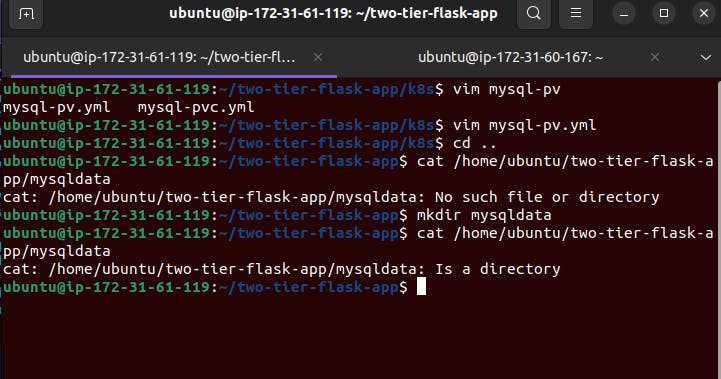
If we have created a persistent volume then we have to claim that it also. make a yaml file
vim ysql-pvc.yml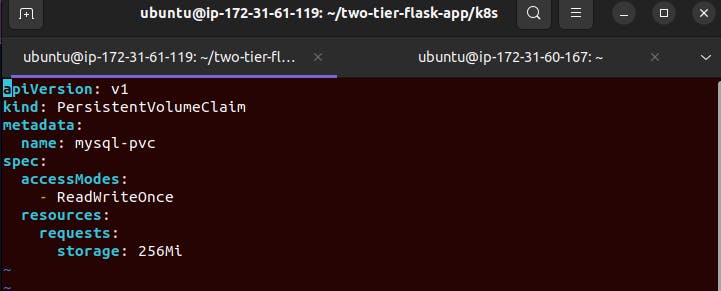
Here we will apply both persistent volume and volume claim yaml files.
  kubectl apply -f mysql-pv.yml
  # and
  kubectl apply -f mysql-pvc.yml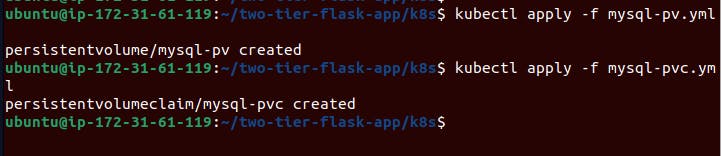
Use the persistent volume in the mysql_deploy file.

we have all settled up with MySQL deployment now we need a service file also to expose these database pods to our application.
create the service file.
vim mysql_svc.yaml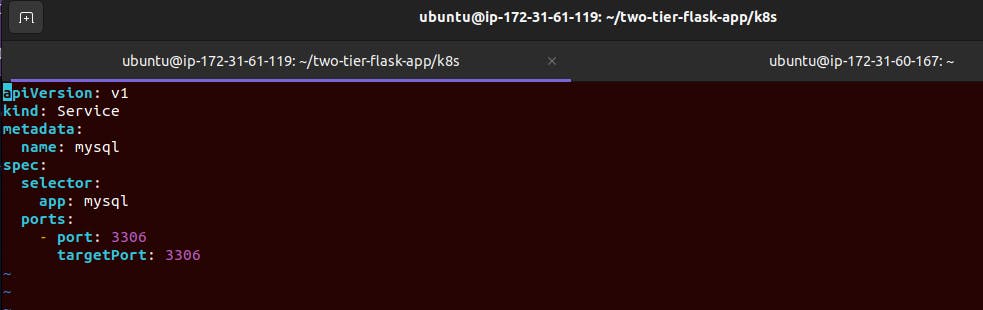
kubectl apply -f mysql-svc.yml
Now everything will be good and the application will be live.
Here we will automate all k8s yaml file creation with the help of HELM charts.
First, we install the Helm chart in our master node.
run the below commands to install.
  curl https://baltocdn.com/helm/signing.asc | gpg --dearmor | sudo tee /usr/share/keyrings/helm.gpg > /dev/null
  sudo apt-get install apt-transport-https --yes
  echo "deb [arch=$(dpkg --print-architecture) signed-by=/usr/share/keyrings/helm.gpg] https://baltocdn.com/helm/stable/debian/ all main" | sudo tee /etc/apt/sources.list.d/helm-stable-debian.list
  sudo apt-get update
  sudo apt-get install helm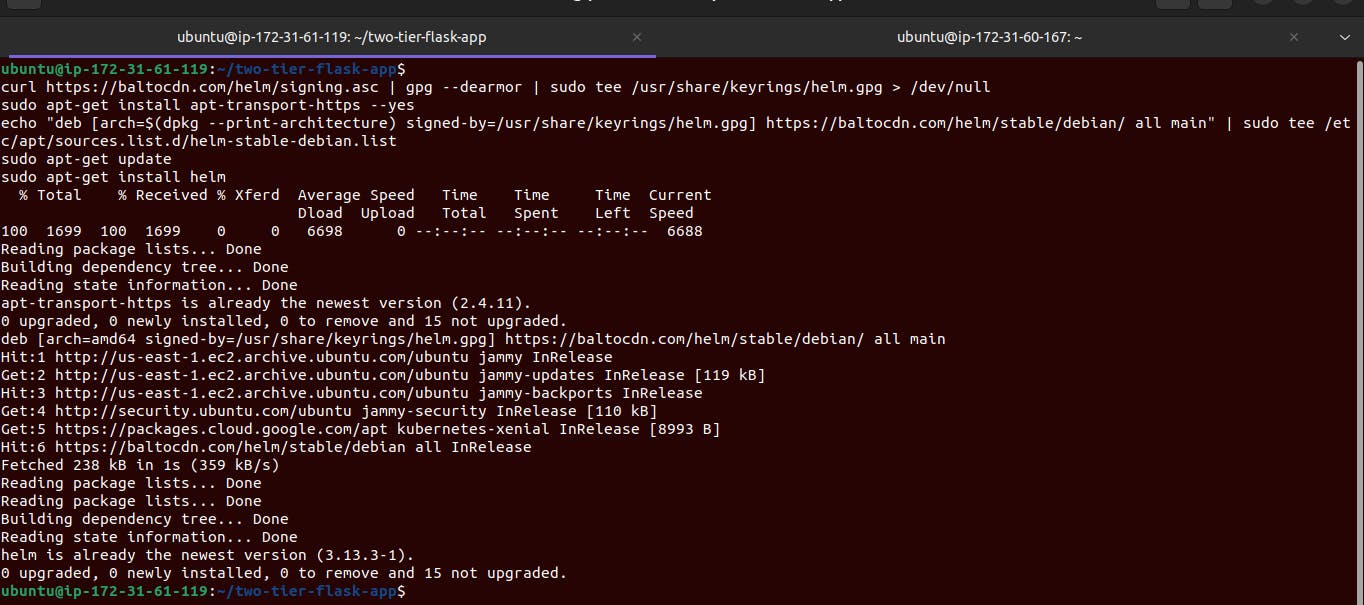
Now create the helm chart folder package for MySQL database.
helm create mysql-helm-chart
Go to the
values.ymlfile and update the environment field.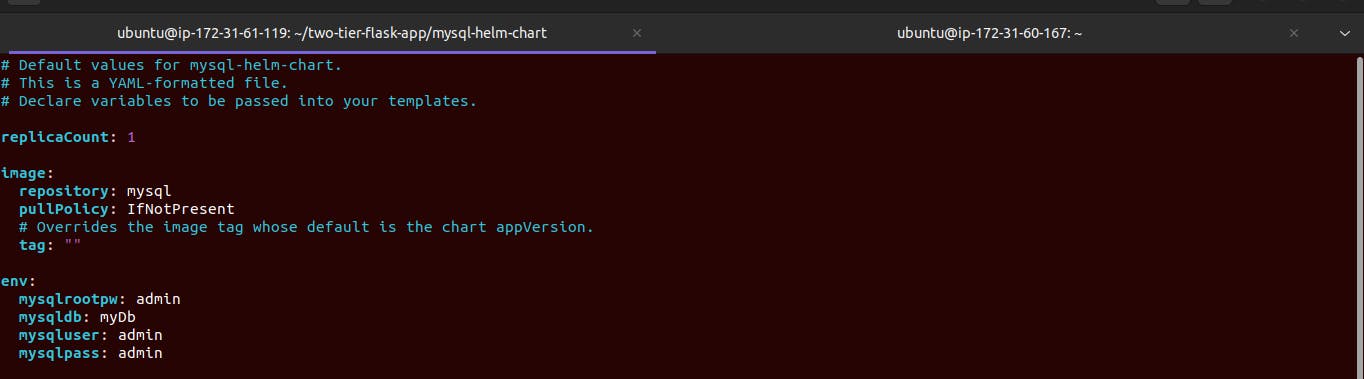
taking reference from
/tempalate/deployment.ymlfile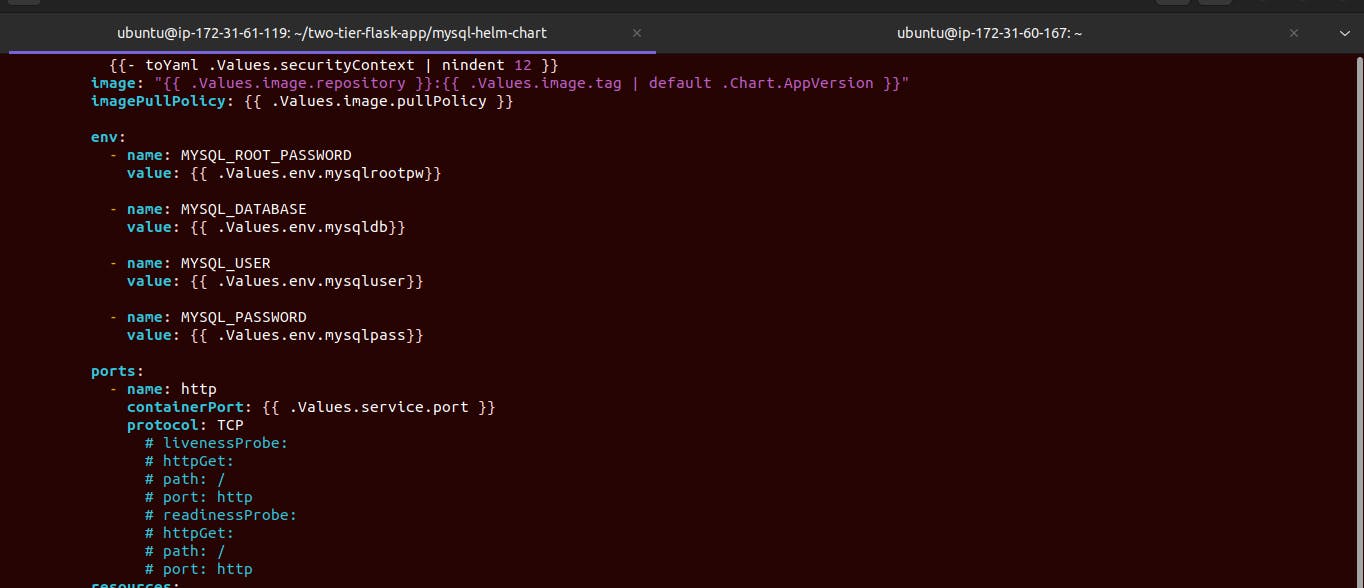
here we will comment on the section
livenessProbeandreadinessProbesection.
Let's go ahead and install the helm chart of mysql from the helm chart folder.
  helm install helm-chart-name  ./helm_folder_name
  #   eg: helm install mysql-chart  ./mysql-helm-chart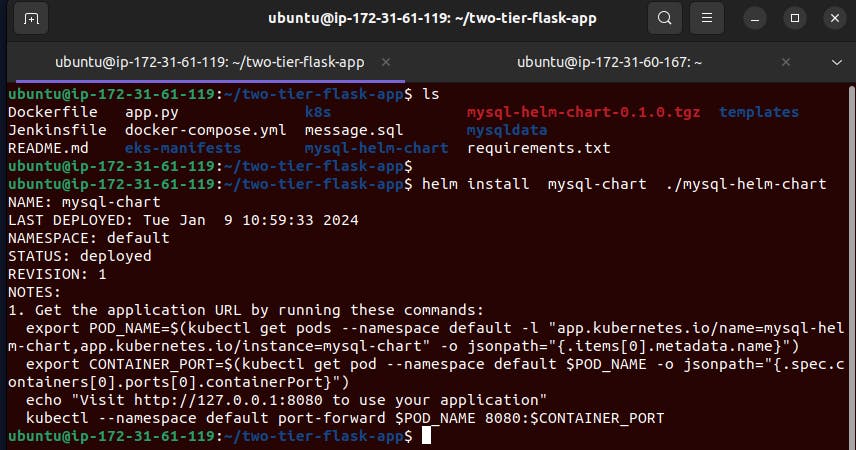
we can verify them.
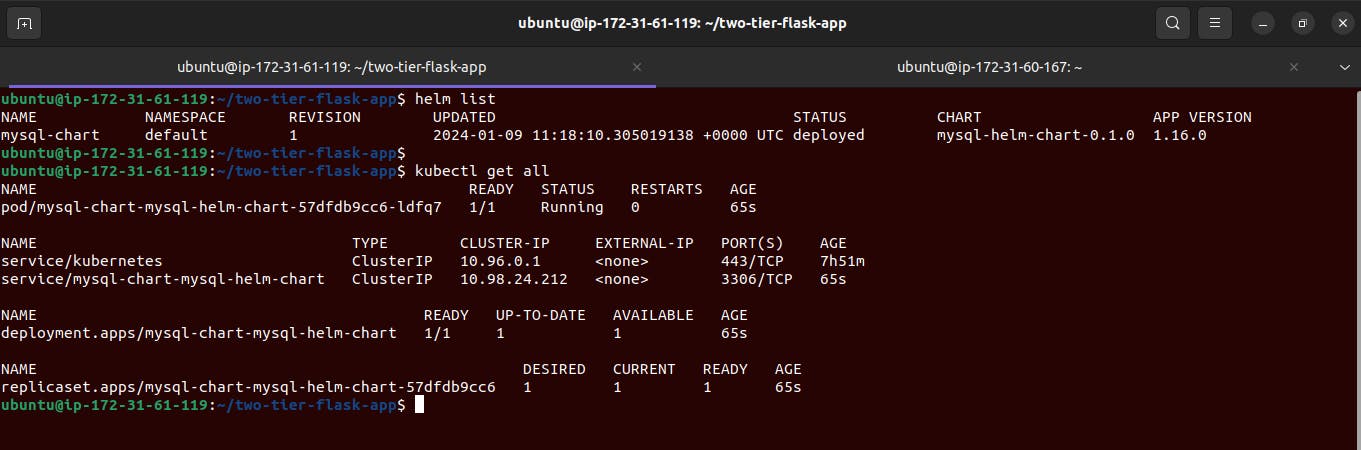
now we all settled up with our mysql-helm chart. our database pods are running and accessible.
In this step, we will create the helm chart for our application folder or pods.
Create the helm-chart folder first.
helm create flask-app-helm-chart

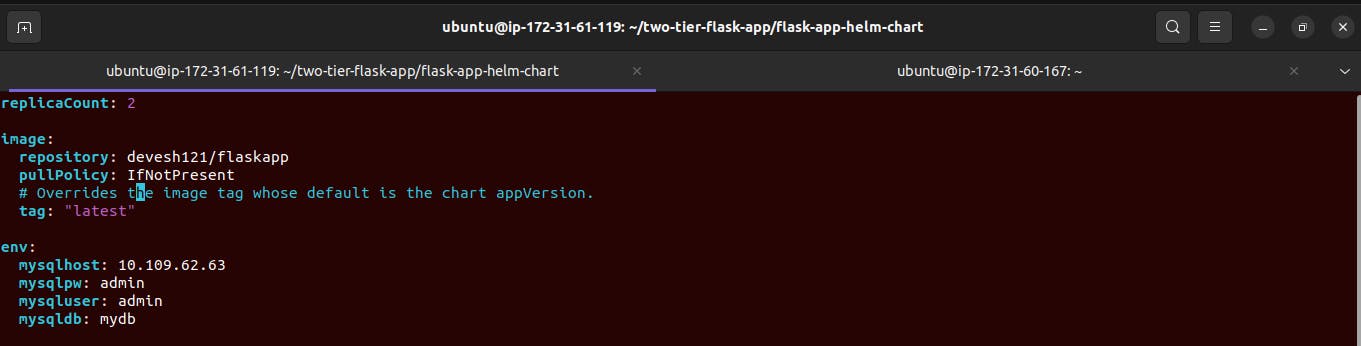
go to the
flask-app-helm-chartsdirectory and open thevalues.yamlfile.updating the replica count to 2 and adding the flask docker image from the docker hub and using the latest tag.
we are also providing the environment variable for the database connection of MySQL.
updating the port variable also.
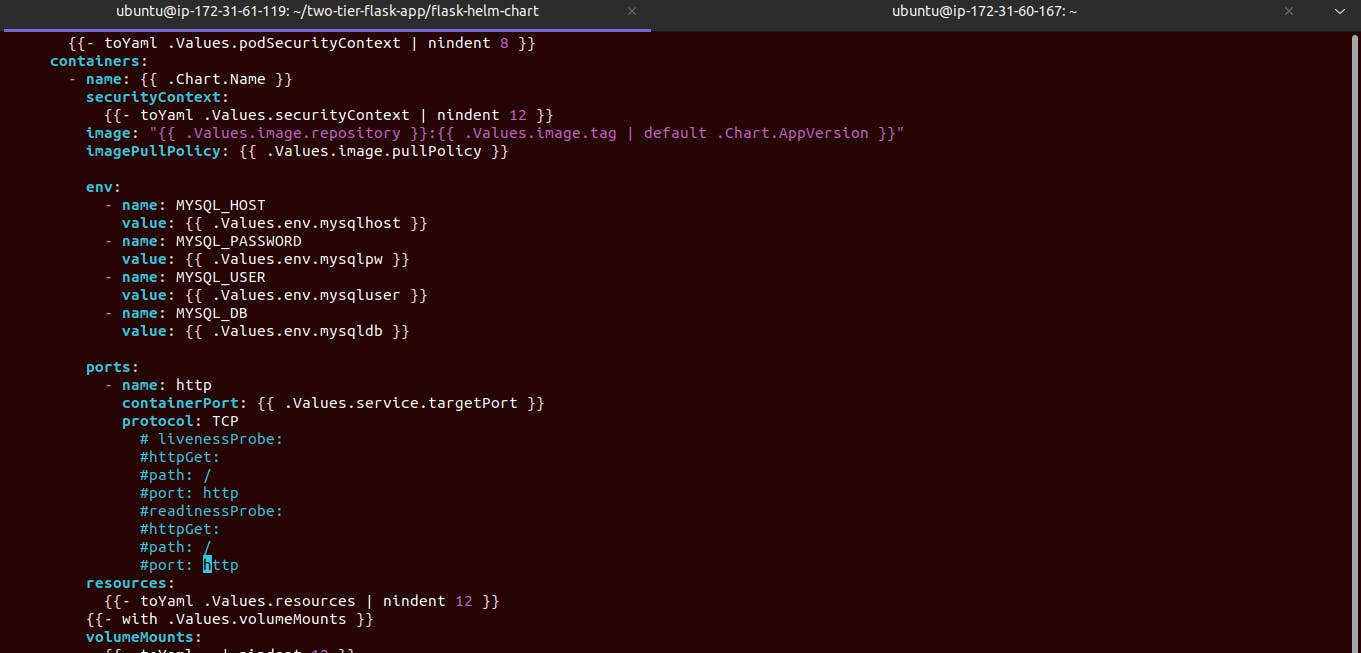
Now we have updated the values.yaml file so we also need to modify or update the deployment.yaml template present in the template folder.
add the environment credentials:
env:- name: MYSQL_HOST value: {{ .Values.env.mysqlhost }}- name: MYSQL_PASSWORD value: {{ .Values.env.mysqlpw }}- name: MYSQL_USER value: {{ .Values.env.mysqluser }}- name: MYSQL_DB value: {{ .Values.env.mysqldb }}add container port as well
containerPort: {{ .Values.service.targetPort }}
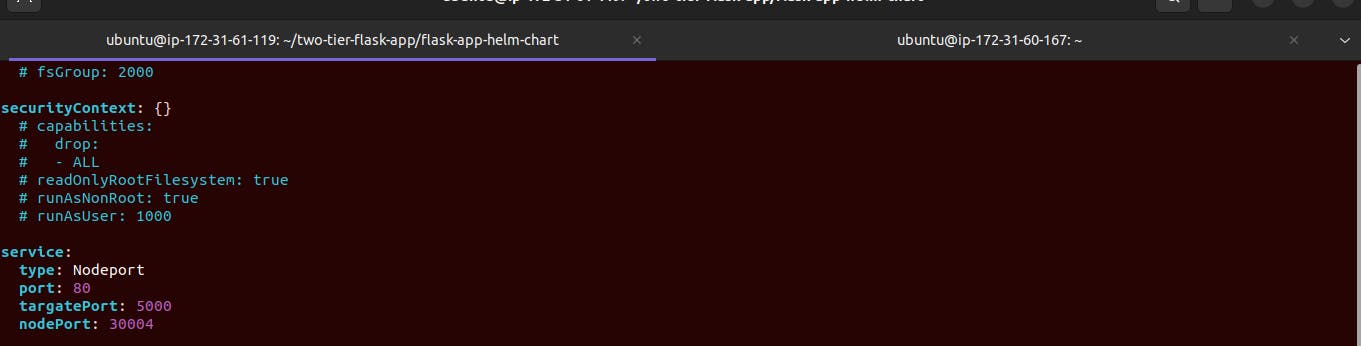
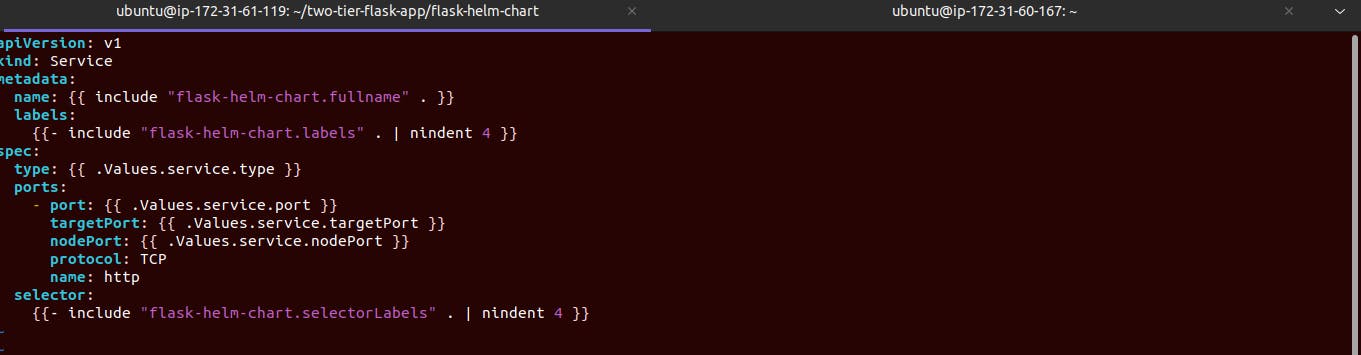
a Modified service file also according to the deployment file.
we have added target port and nodePort also.
targetPort: {{ .Values.service.targetPort }}nodePort: {{ .Values.service.nodePort }}targetPort = 5000 and nodePort=30004
Now we have ready with all yaml file creation so let's check that by helm template.
  helm template flask-helm-chart
  #  flask-helm-chart    <---- this is folder name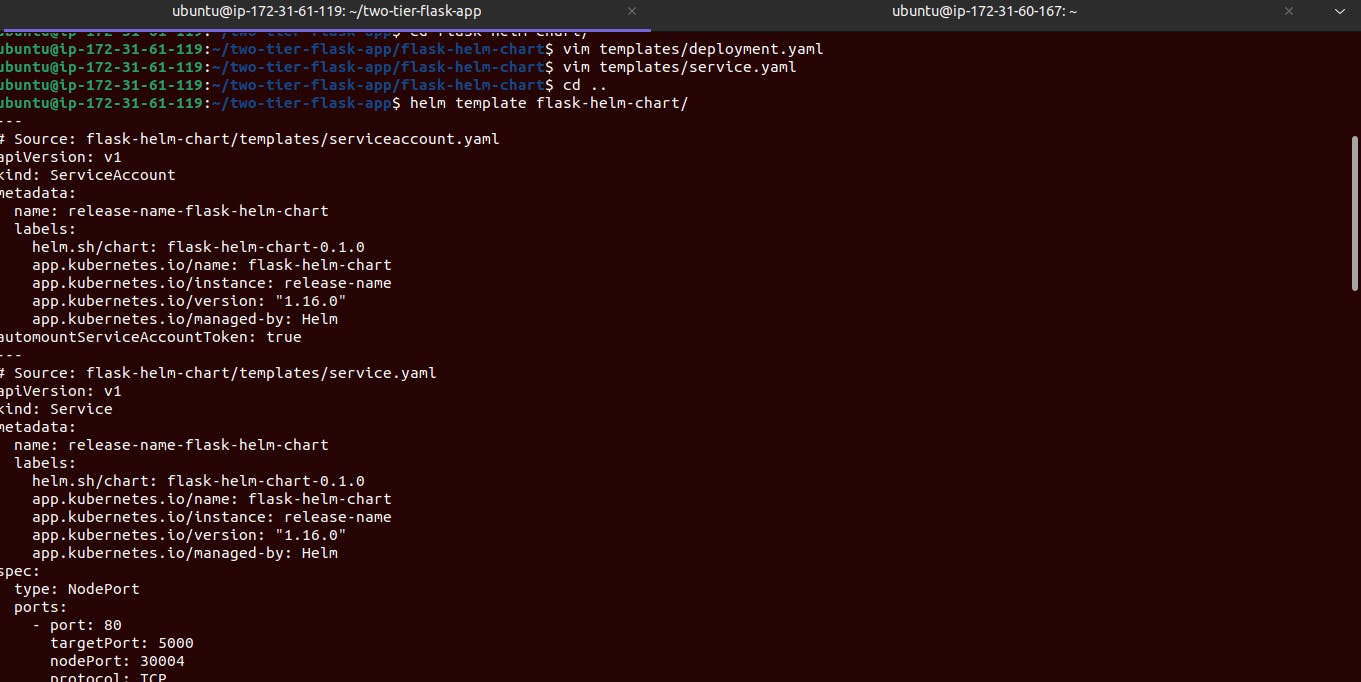
After that package the helm folder with the below command.
  helm package flask-helm-chart
  #  flask-helm-chart    <---- this is folder name
we can see the
.tgzfolder here and our Flask app running live.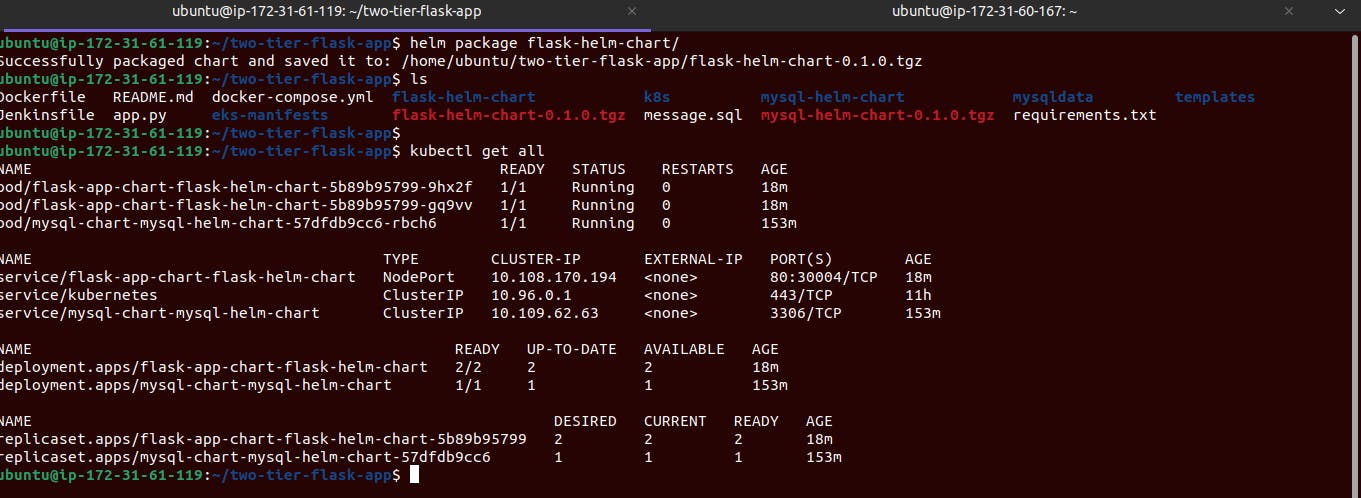
Ok, we have settled all helm packages and successfully launched our flask-mysql app now it is time to stop and kill all pods, deployment, and services with a single command.
  helm uninstall  flask-app-chart mysql-chart
  # flask-app-chart  <-- flask-app helm chart folder.
  # mysql-chart   <-- mysql helm chart folder.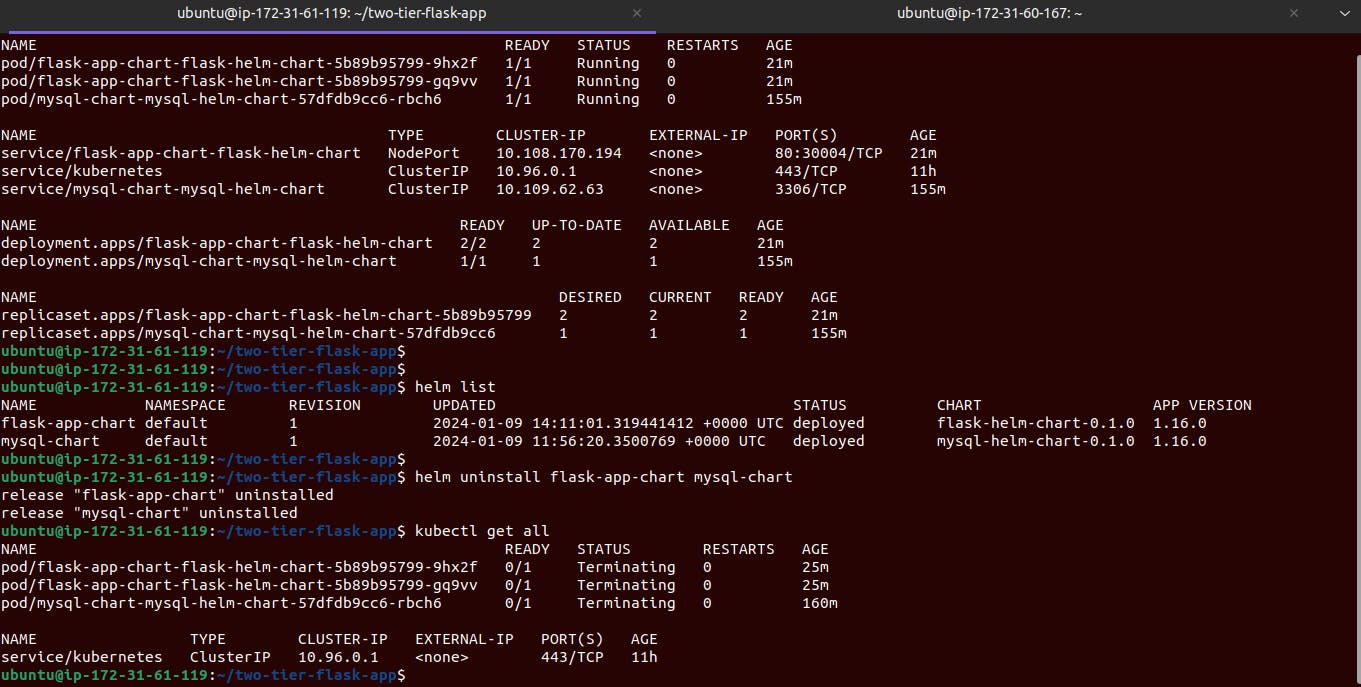
Finally, we have completed our entire project.
Thanks for the reading.
Wait wait , don't forget to terminate all the instances after completing this project.